CarBit
  • Plataforma:Android
  • Versión:3.5.9
  • Tamaño:19.5 MB
  • Desarrollador:MDA VRP
4.0
Descripción

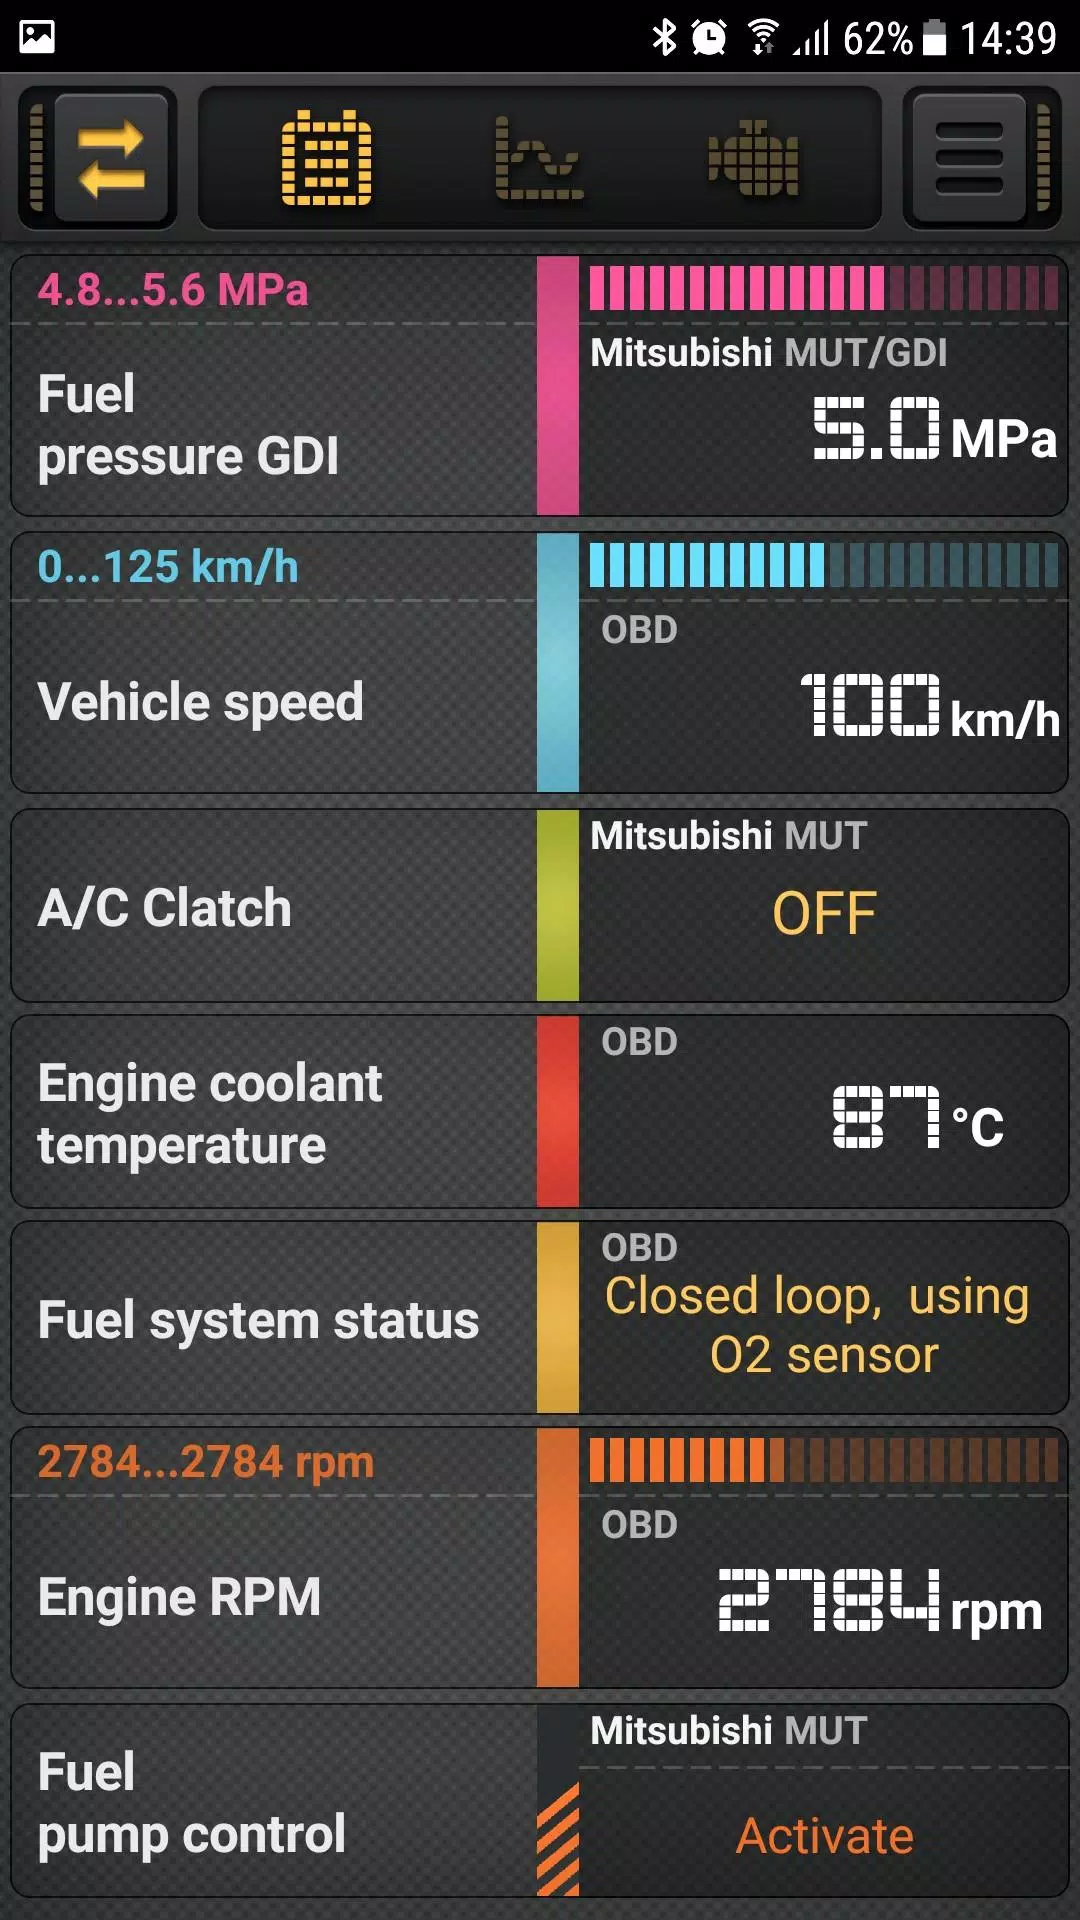
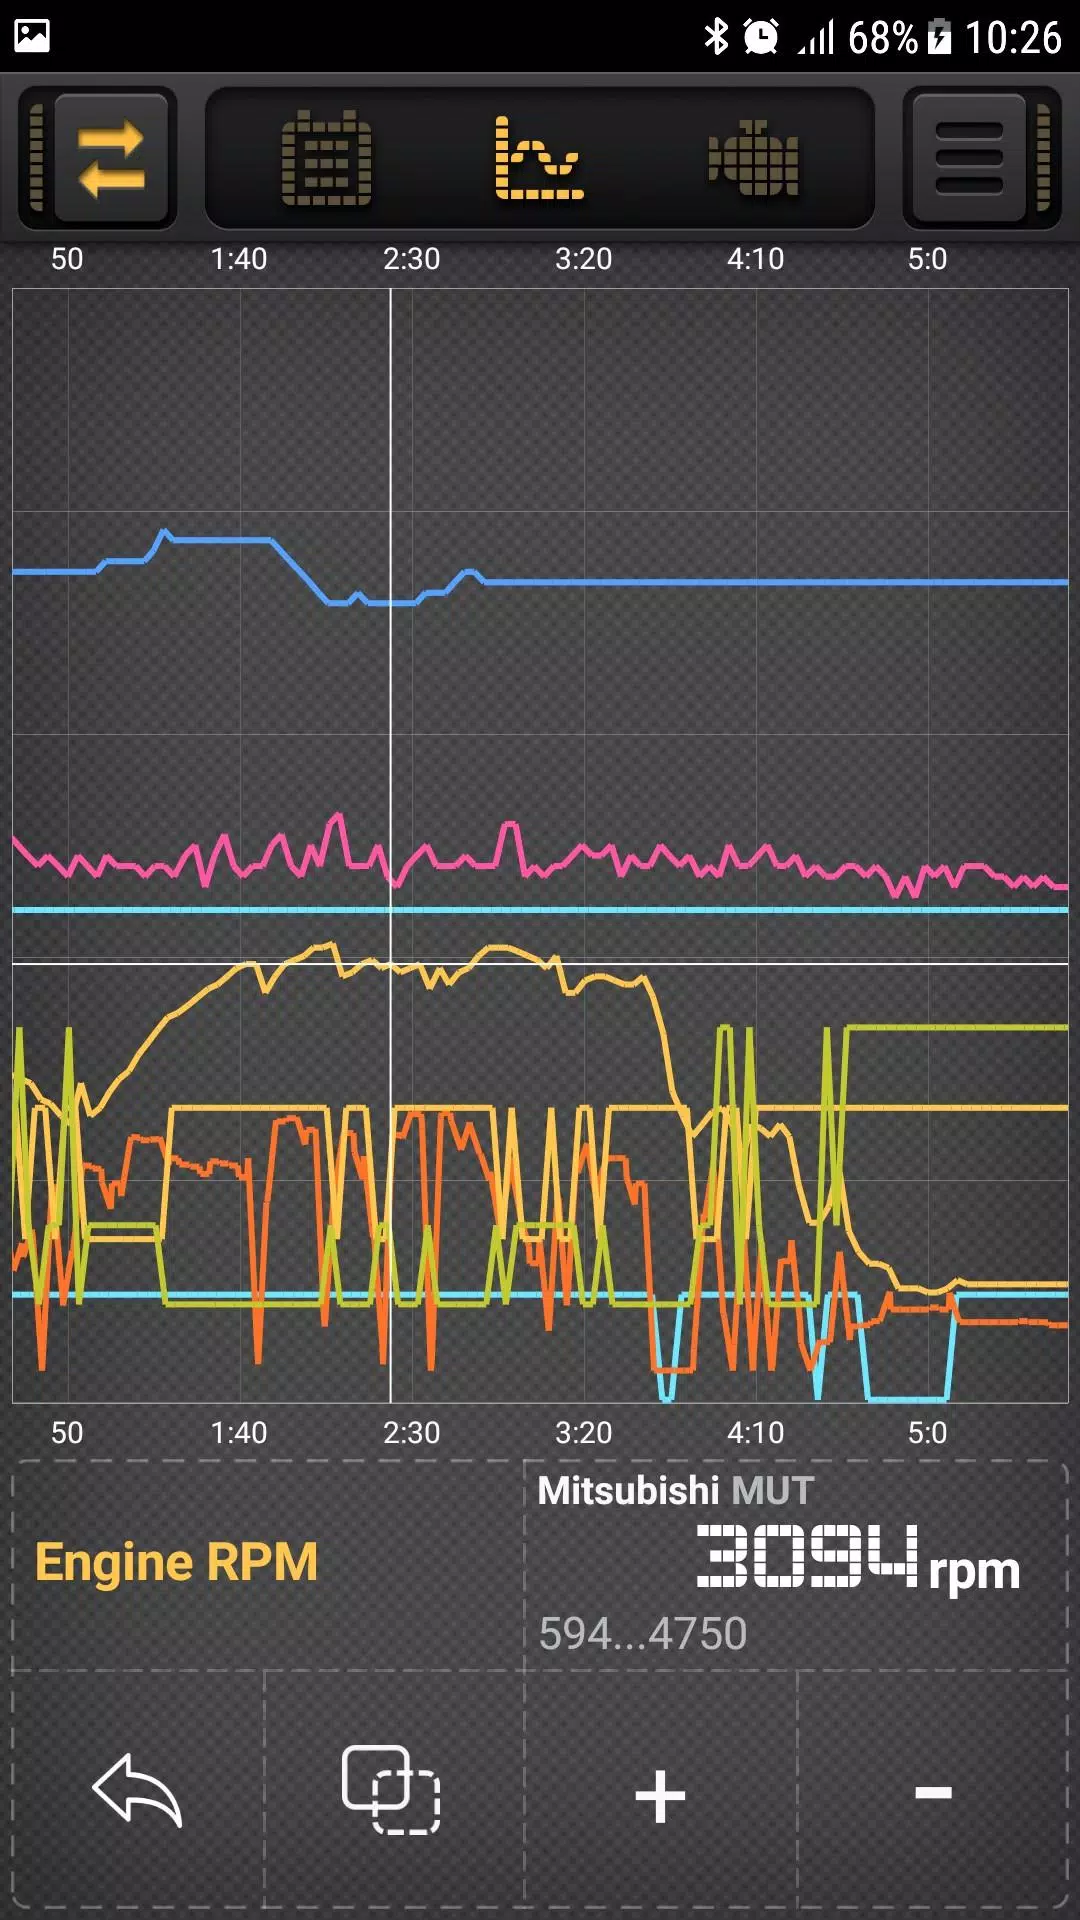
Esta herramienta de diagnóstico de ECU del motor OBD2 utiliza un adaptador Wi-Fi/Bluetooth ELM327 para proporcionar diagnósticos integrales de vehículos. La aplicación muestra datos de varias unidades de control electrónico (ECU), que ofrece representaciones gráficas en tiempo real que se pueden guardar y revisar más adelante. También muestra y restablece los códigos de falla del motor (DTC).

Puede configurar umbrales mínimos/máximos para cada sensor/PID, activando una alarma cuando se exceden estos límites. La aplicación admite adaptadores OBD Bluetooth y Wi-Fi ELM327, aunque las versiones 1.5 a 2.1 se recomiendan debido a problemas reportados con otras versiones.

Nota importante: los chips ELM327 son compatibles solo con vehículos que cumplen con OBD2:

  • Estados Unidos: 1996 y más tarde
  • Europa: 2001 y posterior (Gasoline), 2003 y posterior (diesel)
  • Japón: aproximadamente 2000 y más tarde

Más allá de los parámetros OBDII estándar, la aplicación admite parámetros extendidos para varias marcas de automóviles, que incluyen:

  • BMW - (Diesel, E91+AT)
  • BYD - (MT20U, ABS)
  • Chery - (MT20U, MT20U2, Actecome797)
  • Chrysler/Dodge - (diesel, AT)
  • Citroen - (C4, C5, Sagem2000, Can/AT6, EDC16C3, MEV17.4.2)
  • Daewoo - (Siriusd42)
  • Fiat - (IAW49F, IAW5SF)
  • Ford - (ECU, PWM/AT, PWM/ABS, CAN/DIESEL, CAN/AT, CAN/TPMS, CAN/ABS)
  • Geely - (MT20U, MT20U2, M797)
  • GM/Chevrolet/Pontiac - (ECU, AT, ABS, SiriusD42)
  • Gatriplall - (MT20U2, EOBD, CAN/4D20)
  • Honda - (Fit, Accord, CRV/Diesel, Insight)
  • Jeep - (ECU, Diesel, AT, TPMS)
  • Kia, Hyundai - ~ 15 PID por modelo (temperatura de ATF, golpe detectado, etc.)
  • Land Rover - (Rango/3.6L, DISC4/3.0L, DISC3/TD6, FL2/TD4)
  • Lifan - (MT20U, MT20U2, Actecome797, ME1788, ABS)
  • Mazda - (ECU, AT, ABS, Can/TPMS, Can/SWA)
  • Mercedes - (W203/CDI, W169/CVT, W168)
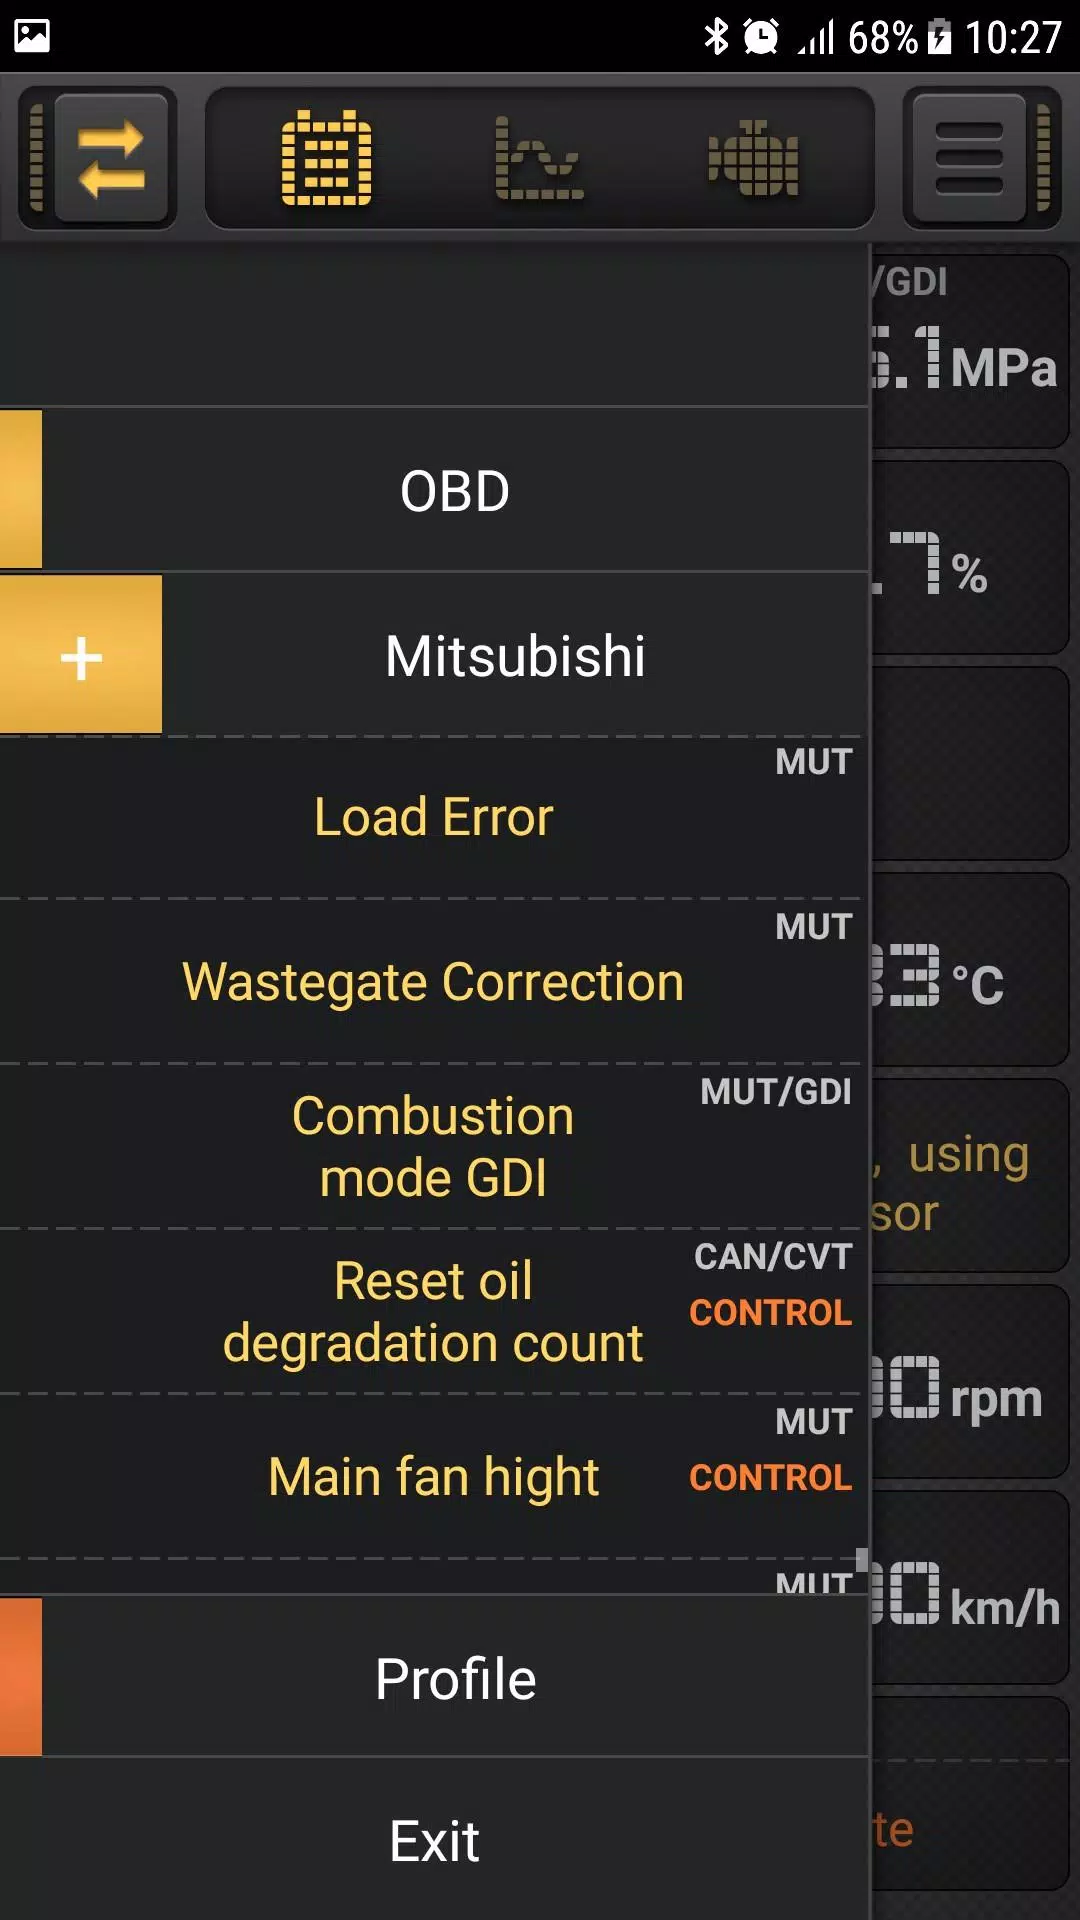
  • Mitsubishi - (Can/ECU, Can/CVT, Can/SS4ii, Can/Awc, Mut/OBD, Mut/GDI) *(Nota: los modelos PRE -2000 Mitsubishi pueden carecer de soporte OBD). *
  • Nissan - (Can/ECU, Can/CVT, Can/Awd, Can/Meter, Consulte2)
  • OPEL - (ECU, AT, ABS, X18XE, Z16XE, Y17DT, CDTI1.6L, CDTI1.3L)
  • Peugeot - (MEV17.4.2, EDC16C3, ME744, AL4/CAN, AL4/KWP)
  • Renault - (Can/ECU, Can/Diesel, KWP/Diesel, Sagem2000, KWP/EMS3132)
  • Skoda - (puede UDS TSI/TFSI)
  • Ssangyong - (KWP/ECU, KWP/AT5, D20DT, CAN/D20DTF, CAN/DSI6)
  • Subaru - (ECU, ECU/Diesel, SSM2, SSM2/Diesel, SSM2/AT, KWP/ABS)
  • Suzuki - (Can/ECU, KWP/ECU)
  • Toyota - (Can/ECU, KWP/ECU, Prius10, Prius20, Prius30/Alpha, Prius30/AC)
  • Vag - (TDI/2.5L, puede UDS TSI/TFSI)
  • Volvo - (D5/P3)
  • VAZ - (Yanvar 7.2, Itelma VS5.1 R83, Itelma M73, Itelma M74 KWP/Can, AT/Jatco, AMT/ZF, Vesta/Largus K4M, H4M)
  • Gaz - (Mikas10.3/11.3, Mikas11/E2)
  • Zaz - (Mikas10.3/11.3, MR140)
  • UAZ - (Mikas10.3/11.3, Mikas11/E2, M86Can)

Nota: No todos los PID en la lista para una marca determinada pueden ser compatibles con su vehículo específico. Puede seleccionar los tipos de PID deseados en "Configuración / tipos de PID". Algunos modelos Mitsubishi permiten el control de ciertos sistemas (ventilador de enfriamiento, bomba de combustible, etc.). Para la lectura de los parámetros MUT y el control del actuador en los modelos Can-Bus Mitsubishi (Montero/Pajero IV, Outlander 2, etc.), configure un perfil con el protocolo ISO 9141-2. (Nota: No todos los modelos Mitsubishi Can-Bus admiten ISO 9141-2.) También es posible la creación de parámetros personalizados.

Versión 3.5.9 (30 de septiembre de 2024)

Soluciones y mejoras menores de errores.

Etiquetas : Auto y vehículos

CarBit capturas de pantalla
  • CarBit Captura de pantalla 0
  • CarBit Captura de pantalla 1
  • CarBit Captura de pantalla 2
  • CarBit Captura de pantalla 3
Últimos artículos
CD > ER > ATK% > Speed (only if needed for turn order) ❌ Avoid: HP%, DEF%, Healing Bonus (unless for a niche support role) 2. Artifact Sets (Recommended) ✅ Best Set (High Burst DPS) 2pc: "The Wasted Heir" (Quantum) 4pc: "The Wasted Heir" (Quantum) Effect: After using an Elemental Burst, gain 30% ATK% and 30% SPD for 1 turn. This stacks up to 2 times. 💡 Why it’s great: Massive burst boost, perfect for a Quantum DPS. The 30% ATK% and SPD boost dramatically increases damage on burst turn. ⚠️ Note: Requires 2-stack management (use burst, then use another ability to refresh the buff). You’ll want to use burst, then normal attack to maintain uptime. 🔁 Alternative (if "The Wasted Heir" not available) 2pc: "Searing Moon" (Quantum) 2pc: "Stalwart and Sojourner" (Quantum) 4pc: "Searing Moon" (Quantum) Effect: After breaking an enemy, gains 20% ATK% and 20% EM (Energy Multiplier) for 2 turns. 💡 Best for: Enemies with high defense or shields, especially in Abyss floors or hard mode. 🔥 High-Efficiency Set (if you need more CDR/ER) 4pc: "The Wasted Heir" (Quantum) 4pc: "The Wasted Heir" (Quantum) + 2pc: "Searing Moon" (if you're struggling with CDR/ER) ✅ Use 2pc: "The Wasted Heir" + 2pc: "Searing Moon" only if you're maxing CDR and want extra EM for Weakness Break. 🛡️ Auras (Emblems) – Aura Selection Note: Auras (Emblems) are passive traits that enhance stats based on character level, rank, and talent level. ✅ Best Aura (Maximize Burst Damage) Emblem: "The Wasted Heir" (Quantum) Effect: After using an Elemental Burst, gain +30% ATK% and +30% SPD for 1 turn. Why: Directly increases damage output on burst turn. ✅ Best for: Single-target burst, boss fights, and hard-mode Abyss. 🔁 Alternative Auras Emblem: "The Wasted Heir" (Quantum) + 2pc: "Searing Moon" (if you want EM boost on Break) Emblem: "Searing Moon" (Quantum) Effect: After breaking an enemy, gain +20% ATK% and +20% EM for 2 turns. ⚠️ Use this only if you're fighting enemies with high defense or shields. 🧩 Talent Priorities Ultimate (Burst): Max as #1 priority (most damage output). Normal Attack: Max to maintain energy and for sub-ability usage. Skill: Max only if it provides useful utility (e.g., energy regeneration, shield, or status effect). Evasion/Defensive Skills: Usually not prioritized unless you’re in a very hard mode or need survivability. ✅ Golden Rule: Burst > Normal Attack > Skill 🎮 Team Synergy Tips Support Pairing: Use a Quantum Break DPS (e.g., Acheron, Yanqing) to trigger Weakness Breaks. Pair with a Debuff/DoT support (e.g., Herta, Pela, Fu Hua) to extend burst uptime. Include a CDR or ER support (e.g., Machina, Setaria) to enable faster bursts. Energy Management: Use characters like Sampo (if available) or Luka to regenerate energy fast. Perfect Turn Order: Place Heirs after your energy regenerator or support, so they can burst immediately. 📊 Final Build Summary Stat Target Notes Main Stat ATK% (if using 4pc The Wasted Heir) Otherwise CR or CD Sub-Stats CR > CD > ER > ATK% > SPD Prioritize CR/CD balance Artifacts 4pc "The Wasted Heir" (Quantum) Best for burst damage Emblems "The Wasted Heir" (Quantum) Boosts burst damage Talents Ultimate > Normal Attack > Skill Max Ultimate first 🏁 Final Thoughts Abyss's Chosen Heirs shines in high-damage burst fights, especially against bosses, elite enemies, and Abyss floors. "The Wasted Heir" set + 4pc emblem is unmatched for Quantum DPS in 5-star tier. Prioritize CR/CD balance, ER for energy sustainability, and team synergy. ✨ Pro Tip: Use "Quantum" or "Break" decks to maximize Weakness Break and burst damage synergy. If you have a specific version of Abyss's Chosen Heirs (e.g., Acheron, Yanqing, or another name), let me know and I’ll tailor the guide exactly to that character. Stay strong, Trailblazer. The Abyss awaits. 🌑⚔️" > Certainly! Here's a comprehensive Stat and Aura Guide for Abyss's Chosen Heirs in Honkai: Star Rail, focusing on optimal builds, stat priorities, and aura (Emblem) selection to maximize damage, survivability, and team synergy.

🌑 Abyss's Chosen Heirs – Overview

Character: Abyss's Chosen Heirs (often known as Heirs or Herald of the Abyss, depending on version)
Path: Destruction (Damage-dealing, burst-focused)
Element: Quantum
Role: Main DPS / Burst Damage Dealer
Team Role: High burst, strong single-target damage, excels against bosses and elite enemies.


Note: This guide assumes you're using the 5-star Quantum DPS character with the signature CD > ER > ATK% > Speed (only if needed for turn order) ❌ Avoid: HP%, DEF%, Healing Bonus (unless for a niche support role) 2. Artifact Sets (Recommended) ✅ Best Set (High Burst DPS) 2pc: "The Wasted Heir" (Quantum) 4pc: "The Wasted Heir" (Quantum) Effect: After using an Elemental Burst, gain 30% ATK% and 30% SPD for 1 turn. This stacks up to 2 times. 💡 Why it’s great: Massive burst boost, perfect for a Quantum DPS. The 30% ATK% and SPD boost dramatically increases damage on burst turn. ⚠️ Note: Requires 2-stack management (use burst, then use another ability to refresh the buff). You’ll want to use burst, then normal attack to maintain uptime. 🔁 Alternative (if "The Wasted Heir" not available) 2pc: "Searing Moon" (Quantum) 2pc: "Stalwart and Sojourner" (Quantum) 4pc: "Searing Moon" (Quantum) Effect: After breaking an enemy, gains 20% ATK% and 20% EM (Energy Multiplier) for 2 turns. 💡 Best for: Enemies with high defense or shields, especially in Abyss floors or hard mode. 🔥 High-Efficiency Set (if you need more CDR/ER) 4pc: "The Wasted Heir" (Quantum) 4pc: "The Wasted Heir" (Quantum) + 2pc: "Searing Moon" (if you're struggling with CDR/ER) ✅ Use 2pc: "The Wasted Heir" + 2pc: "Searing Moon" only if you're maxing CDR and want extra EM for Weakness Break. 🛡️ Auras (Emblems) – Aura Selection Note: Auras (Emblems) are passive traits that enhance stats based on character level, rank, and talent level. ✅ Best Aura (Maximize Burst Damage) Emblem: "The Wasted Heir" (Quantum) Effect: After using an Elemental Burst, gain +30% ATK% and +30% SPD for 1 turn. Why: Directly increases damage output on burst turn. ✅ Best for: Single-target burst, boss fights, and hard-mode Abyss. 🔁 Alternative Auras Emblem: "The Wasted Heir" (Quantum) + 2pc: "Searing Moon" (if you want EM boost on Break) Emblem: "Searing Moon" (Quantum) Effect: After breaking an enemy, gain +20% ATK% and +20% EM for 2 turns. ⚠️ Use this only if you're fighting enemies with high defense or shields. 🧩 Talent Priorities Ultimate (Burst): Max as #1 priority (most damage output). Normal Attack: Max to maintain energy and for sub-ability usage. Skill: Max only if it provides useful utility (e.g., energy regeneration, shield, or status effect). Evasion/Defensive Skills: Usually not prioritized unless you’re in a very hard mode or need survivability. ✅ Golden Rule: Burst > Normal Attack > Skill 🎮 Team Synergy Tips Support Pairing: Use a Quantum Break DPS (e.g., Acheron, Yanqing) to trigger Weakness Breaks. Pair with a Debuff/DoT support (e.g., Herta, Pela, Fu Hua) to extend burst uptime. Include a CDR or ER support (e.g., Machina, Setaria) to enable faster bursts. Energy Management: Use characters like Sampo (if available) or Luka to regenerate energy fast. Perfect Turn Order: Place Heirs after your energy regenerator or support, so they can burst immediately. 📊 Final Build Summary Stat Target Notes Main Stat ATK% (if using 4pc The Wasted Heir) Otherwise CR or CD Sub-Stats CR > CD > ER > ATK% > SPD Prioritize CR/CD balance Artifacts 4pc "The Wasted Heir" (Quantum) Best for burst damage Emblems "The Wasted Heir" (Quantum) Boosts burst damage Talents Ultimate > Normal Attack > Skill Max Ultimate first 🏁 Final Thoughts Abyss's Chosen Heirs shines in high-damage burst fights, especially against bosses, elite enemies, and Abyss floors. "The Wasted Heir" set + 4pc emblem is unmatched for Quantum DPS in 5-star tier. Prioritize CR/CD balance, ER for energy sustainability, and team synergy. ✨ Pro Tip: Use "Quantum" or "Break" decks to maximize Weakness Break and burst damage synergy. If you have a specific version of Abyss's Chosen Heirs (e.g., Acheron, Yanqing, or another name), let me know and I’ll tailor the guide exactly to that character. Stay strong, Trailblazer. The Abyss awaits. 🌑⚔️" onerror="this.onerror='';this.src='/assets/images/morentu/200-200.png'" uk-cover>