Meteomont

Meteomont

Vida de moda
4.5
Descripción

Meteomont Aplicación: Tu compañera de seguridad en la montaña

Manténgase informado y seguro con la aplicación Meteomont, su herramienta esencial para el clima de montaña y las condiciones de nieve. Desarrollada por el Servicio Nacional Italiano de Alerta de Nieve y Avalanchas, esta aplicación proporciona boletines de avalanchas cruciales, herramientas prácticas e información vital para todas las actividades de montaña y fuera de pista. Ya seas un profesional experimentado o un aventurero novato, Meteomont te permite tomar decisiones informadas en entornos potencialmente peligrosos. Recuerde, si bien la aplicación ofrece información valiosa, la evaluación personal de las condiciones locales es clave para garantizar su seguridad. Descarga Meteomont hoy y conquista las montañas de manera responsable.

Características clave:

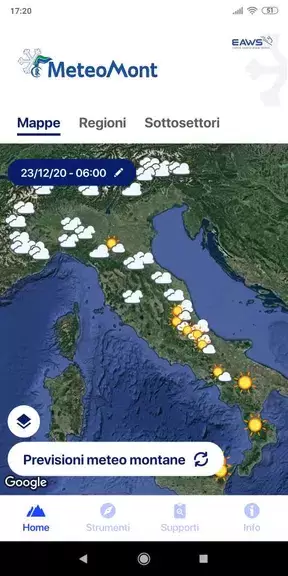
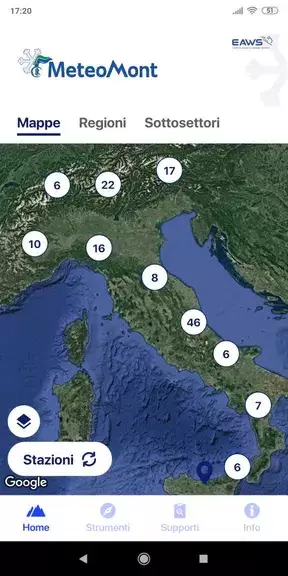
  • Previsiones meteorológicas personalizadas: Reciba previsiones meteorológicas precisas adaptadas a su ubicación montañosa específica, optimizando sus planes al aire libre.
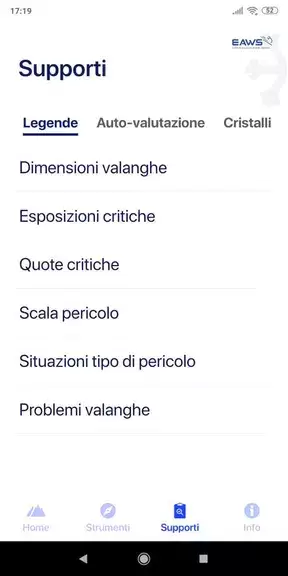
  • Boletines de avalanchas actualizados: Acceda a los boletines de avalanchas más recientes para estar al tanto de los riesgos actuales y tomar decisiones más seguras en el campo.
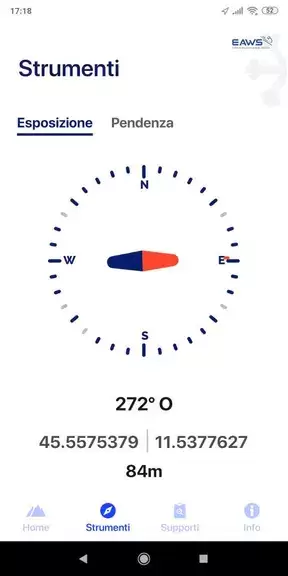
  • Herramientas útiles: Utilice una variedad de herramientas prácticas que incluyen mapas interactivos, medición de ángulos de pendiente e información de contacto de emergencia.
  • Interfaz intuitiva: Navegue fácilmente a través de un diseño simple y fácil de usar, accediendo rápidamente a la información que necesita.

Preguntas frecuentes:

  • ¿La aplicación es gratuita? Sí, Meteomont se puede descargar y utilizar de forma gratuita y ofrece valiosos datos meteorológicos y de avalanchas sin coste alguno.
  • ¿Cubre varias regiones? Sí, puede acceder a boletines de avalanchas de varias regiones para comprobar los niveles de peligro de avalanchas en diferentes áreas.
  • ¿Qué tan precisos son los pronósticos? Meteomont se esfuerza por ser precisos, pero los usuarios siempre deben realizar sus propias evaluaciones y tomar las precauciones necesarias en las montañas.

Conclusión:

Meteomont es una aplicación integral diseñada para usuarios de montaña y zonas rurales, que proporciona información meteorológica personalizada, informes de avalanchas, herramientas prácticas y una interfaz fácil de usar. Es un recurso indispensable para cualquiera que se aventure en las montañas, ya que le garantiza mantenerse informado, seguro y disfrutar sus aventuras al máximo. Descarga la aplicación ahora para mejorar tu experiencia al aire libre.

Etiquetas : Estilo de vida

Meteomont capturas de pantalla
  • Meteomont Captura de pantalla 0
  • Meteomont Captura de pantalla 1
  • Meteomont Captura de pantalla 2
  • Meteomont Captura de pantalla 3
MountainMan Feb 18,2025

Essential app for anyone hiking in the mountains. Provides accurate weather and avalanche information. Highly recommend for safety!

Bergsteiger Feb 08,2025

Die App ist okay, aber die Informationen sind manchmal etwas spärlich. Es könnte mehr Details geben.

登山爱好者 Jan 24,2025

对登山者来说非常实用,提供了准确的天气和雪崩信息,提高了安全性。

Alpiniste Jan 15,2025

Application indispensable pour la sécurité en montagne. Informations précises et fiables sur les conditions météo et les risques d'avalanches. Je recommande fortement !

Montaña Jan 15,2025

Aplicación útil para la información meteorológica en la montaña. Sin embargo, la interfaz podría ser más intuitiva.

Últimos artículos
CD > ER > ATK% > Speed (only if needed for turn order) ❌ Avoid: HP%, DEF%, Healing Bonus (unless for a niche support role) 2. Artifact Sets (Recommended) ✅ Best Set (High Burst DPS) 2pc: "The Wasted Heir" (Quantum) 4pc: "The Wasted Heir" (Quantum) Effect: After using an Elemental Burst, gain 30% ATK% and 30% SPD for 1 turn. This stacks up to 2 times. 💡 Why it’s great: Massive burst boost, perfect for a Quantum DPS. The 30% ATK% and SPD boost dramatically increases damage on burst turn. ⚠️ Note: Requires 2-stack management (use burst, then use another ability to refresh the buff). You’ll want to use burst, then normal attack to maintain uptime. 🔁 Alternative (if "The Wasted Heir" not available) 2pc: "Searing Moon" (Quantum) 2pc: "Stalwart and Sojourner" (Quantum) 4pc: "Searing Moon" (Quantum) Effect: After breaking an enemy, gains 20% ATK% and 20% EM (Energy Multiplier) for 2 turns. 💡 Best for: Enemies with high defense or shields, especially in Abyss floors or hard mode. 🔥 High-Efficiency Set (if you need more CDR/ER) 4pc: "The Wasted Heir" (Quantum) 4pc: "The Wasted Heir" (Quantum) + 2pc: "Searing Moon" (if you're struggling with CDR/ER) ✅ Use 2pc: "The Wasted Heir" + 2pc: "Searing Moon" only if you're maxing CDR and want extra EM for Weakness Break. 🛡️ Auras (Emblems) – Aura Selection Note: Auras (Emblems) are passive traits that enhance stats based on character level, rank, and talent level. ✅ Best Aura (Maximize Burst Damage) Emblem: "The Wasted Heir" (Quantum) Effect: After using an Elemental Burst, gain +30% ATK% and +30% SPD for 1 turn. Why: Directly increases damage output on burst turn. ✅ Best for: Single-target burst, boss fights, and hard-mode Abyss. 🔁 Alternative Auras Emblem: "The Wasted Heir" (Quantum) + 2pc: "Searing Moon" (if you want EM boost on Break) Emblem: "Searing Moon" (Quantum) Effect: After breaking an enemy, gain +20% ATK% and +20% EM for 2 turns. ⚠️ Use this only if you're fighting enemies with high defense or shields. 🧩 Talent Priorities Ultimate (Burst): Max as #1 priority (most damage output). Normal Attack: Max to maintain energy and for sub-ability usage. Skill: Max only if it provides useful utility (e.g., energy regeneration, shield, or status effect). Evasion/Defensive Skills: Usually not prioritized unless you’re in a very hard mode or need survivability. ✅ Golden Rule: Burst > Normal Attack > Skill 🎮 Team Synergy Tips Support Pairing: Use a Quantum Break DPS (e.g., Acheron, Yanqing) to trigger Weakness Breaks. Pair with a Debuff/DoT support (e.g., Herta, Pela, Fu Hua) to extend burst uptime. Include a CDR or ER support (e.g., Machina, Setaria) to enable faster bursts. Energy Management: Use characters like Sampo (if available) or Luka to regenerate energy fast. Perfect Turn Order: Place Heirs after your energy regenerator or support, so they can burst immediately. 📊 Final Build Summary Stat Target Notes Main Stat ATK% (if using 4pc The Wasted Heir) Otherwise CR or CD Sub-Stats CR > CD > ER > ATK% > SPD Prioritize CR/CD balance Artifacts 4pc "The Wasted Heir" (Quantum) Best for burst damage Emblems "The Wasted Heir" (Quantum) Boosts burst damage Talents Ultimate > Normal Attack > Skill Max Ultimate first 🏁 Final Thoughts Abyss's Chosen Heirs shines in high-damage burst fights, especially against bosses, elite enemies, and Abyss floors. "The Wasted Heir" set + 4pc emblem is unmatched for Quantum DPS in 5-star tier. Prioritize CR/CD balance, ER for energy sustainability, and team synergy. ✨ Pro Tip: Use "Quantum" or "Break" decks to maximize Weakness Break and burst damage synergy. If you have a specific version of Abyss's Chosen Heirs (e.g., Acheron, Yanqing, or another name), let me know and I’ll tailor the guide exactly to that character. Stay strong, Trailblazer. The Abyss awaits. 🌑⚔️" > Certainly! Here's a comprehensive Stat and Aura Guide for Abyss's Chosen Heirs in Honkai: Star Rail, focusing on optimal builds, stat priorities, and aura (Emblem) selection to maximize damage, survivability, and team synergy.

🌑 Abyss's Chosen Heirs – Overview

Character: Abyss's Chosen Heirs (often known as Heirs or Herald of the Abyss, depending on version)
Path: Destruction (Damage-dealing, burst-focused)
Element: Quantum
Role: Main DPS / Burst Damage Dealer
Team Role: High burst, strong single-target damage, excels against bosses and elite enemies.


Note: This guide assumes you're using the 5-star Quantum DPS character with the signature CD > ER > ATK% > Speed (only if needed for turn order) ❌ Avoid: HP%, DEF%, Healing Bonus (unless for a niche support role) 2. Artifact Sets (Recommended) ✅ Best Set (High Burst DPS) 2pc: "The Wasted Heir" (Quantum) 4pc: "The Wasted Heir" (Quantum) Effect: After using an Elemental Burst, gain 30% ATK% and 30% SPD for 1 turn. This stacks up to 2 times. 💡 Why it’s great: Massive burst boost, perfect for a Quantum DPS. The 30% ATK% and SPD boost dramatically increases damage on burst turn. ⚠️ Note: Requires 2-stack management (use burst, then use another ability to refresh the buff). You’ll want to use burst, then normal attack to maintain uptime. 🔁 Alternative (if "The Wasted Heir" not available) 2pc: "Searing Moon" (Quantum) 2pc: "Stalwart and Sojourner" (Quantum) 4pc: "Searing Moon" (Quantum) Effect: After breaking an enemy, gains 20% ATK% and 20% EM (Energy Multiplier) for 2 turns. 💡 Best for: Enemies with high defense or shields, especially in Abyss floors or hard mode. 🔥 High-Efficiency Set (if you need more CDR/ER) 4pc: "The Wasted Heir" (Quantum) 4pc: "The Wasted Heir" (Quantum) + 2pc: "Searing Moon" (if you're struggling with CDR/ER) ✅ Use 2pc: "The Wasted Heir" + 2pc: "Searing Moon" only if you're maxing CDR and want extra EM for Weakness Break. 🛡️ Auras (Emblems) – Aura Selection Note: Auras (Emblems) are passive traits that enhance stats based on character level, rank, and talent level. ✅ Best Aura (Maximize Burst Damage) Emblem: "The Wasted Heir" (Quantum) Effect: After using an Elemental Burst, gain +30% ATK% and +30% SPD for 1 turn. Why: Directly increases damage output on burst turn. ✅ Best for: Single-target burst, boss fights, and hard-mode Abyss. 🔁 Alternative Auras Emblem: "The Wasted Heir" (Quantum) + 2pc: "Searing Moon" (if you want EM boost on Break) Emblem: "Searing Moon" (Quantum) Effect: After breaking an enemy, gain +20% ATK% and +20% EM for 2 turns. ⚠️ Use this only if you're fighting enemies with high defense or shields. 🧩 Talent Priorities Ultimate (Burst): Max as #1 priority (most damage output). Normal Attack: Max to maintain energy and for sub-ability usage. Skill: Max only if it provides useful utility (e.g., energy regeneration, shield, or status effect). Evasion/Defensive Skills: Usually not prioritized unless you’re in a very hard mode or need survivability. ✅ Golden Rule: Burst > Normal Attack > Skill 🎮 Team Synergy Tips Support Pairing: Use a Quantum Break DPS (e.g., Acheron, Yanqing) to trigger Weakness Breaks. Pair with a Debuff/DoT support (e.g., Herta, Pela, Fu Hua) to extend burst uptime. Include a CDR or ER support (e.g., Machina, Setaria) to enable faster bursts. Energy Management: Use characters like Sampo (if available) or Luka to regenerate energy fast. Perfect Turn Order: Place Heirs after your energy regenerator or support, so they can burst immediately. 📊 Final Build Summary Stat Target Notes Main Stat ATK% (if using 4pc The Wasted Heir) Otherwise CR or CD Sub-Stats CR > CD > ER > ATK% > SPD Prioritize CR/CD balance Artifacts 4pc "The Wasted Heir" (Quantum) Best for burst damage Emblems "The Wasted Heir" (Quantum) Boosts burst damage Talents Ultimate > Normal Attack > Skill Max Ultimate first 🏁 Final Thoughts Abyss's Chosen Heirs shines in high-damage burst fights, especially against bosses, elite enemies, and Abyss floors. "The Wasted Heir" set + 4pc emblem is unmatched for Quantum DPS in 5-star tier. Prioritize CR/CD balance, ER for energy sustainability, and team synergy. ✨ Pro Tip: Use "Quantum" or "Break" decks to maximize Weakness Break and burst damage synergy. If you have a specific version of Abyss's Chosen Heirs (e.g., Acheron, Yanqing, or another name), let me know and I’ll tailor the guide exactly to that character. Stay strong, Trailblazer. The Abyss awaits. 🌑⚔️" onerror="this.onerror='';this.src='/assets/images/morentu/200-200.png'" uk-cover>