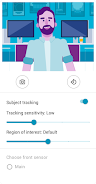
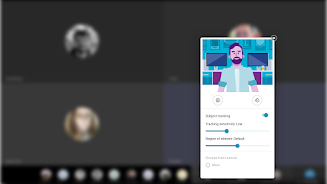
¡Presentamos la aplicación Moto Camera Desktop Settings! Mejore sus videollamadas con configuraciones de cámara personalizadas mientras está conectado a una pantalla externa usando la plataforma ReadyFor. Mantenga a sus sujetos perfectamente centrados en el encuadre con el seguimiento de sujetos, impulsado por un software inteligente que reconoce hasta 3 rostros simultáneamente. Ajuste la sensibilidad de seguimiento para controlar la rapidez con la que la cámara hace zoom cuando un sujeto se mueve. Amplíe la región de interés para capturar más sujetos o redúzcala para incluir más del entorno circundante. Si su cámara frontal o trasera cuenta con múltiples sensores, tiene la libertad de elegir cuál utilizar. También puedes girar la cámara vertical u horizontalmente sin esfuerzo. Descárgalo ahora y desbloquea un mundo de increíbles configuraciones de cámara Motorola para tus videollamadas.
Características de esta aplicación:
- Personalice la configuración de la cámara para mejorar las videollamadas mientras está conectado a una pantalla externa.
- El seguimiento de sujetos mantiene a los sujetos centrados en el encuadre.
- El software inteligente reconoce hasta 3 rostros en el mismo fotograma.
- Ajusta la sensibilidad de seguimiento para controlar el zoom cuando un sujeto se mueve.
- Aumenta o disminuye la región de interés para incluir más o menos campo de visión con los sujetos.
- Elija qué sensor de cámara usar cuando un dispositivo tiene múltiples sensores.
Conclusión:
La aplicación MotoCameraDesktopSettings permite a los usuarios personalizar sin esfuerzo la configuración de su cámara, transformando su experiencia de videollamadas mientras están conectados a una pantalla externa. La aplicación cuenta con funciones como seguimiento de sujetos, reconocimiento facial y sensibilidad de seguimiento ajustable. Los usuarios tienen control total sobre la región de interés, lo que les permite centrarse en temas específicos o capturar el entorno más amplio. En general, esta aplicación proporciona una manera perfecta de optimizar la configuración de la cámara para videollamadas. Descárguelo ahora y mejore su experiencia de videollamadas con la configuración de la cámara de Motorola.
Etiquetas : Fotografía
CD > ER > ATK% > Speed (only if needed for turn order)
❌ Avoid: HP%, DEF%, Healing Bonus (unless for a niche support role)
2. Artifact Sets (Recommended)
✅ Best Set (High Burst DPS)
2pc: "The Wasted Heir" (Quantum)
4pc: "The Wasted Heir" (Quantum)
Effect: After using an Elemental Burst, gain 30% ATK% and 30% SPD for 1 turn. This stacks up to 2 times.
💡 Why it’s great: Massive burst boost, perfect for a Quantum DPS. The 30% ATK% and SPD boost dramatically increases damage on burst turn.
⚠️ Note: Requires 2-stack management (use burst, then use another ability to refresh the buff). You’ll want to use burst, then normal attack to maintain uptime.
🔁 Alternative (if "The Wasted Heir" not available)
2pc: "Searing Moon" (Quantum)
2pc: "Stalwart and Sojourner" (Quantum)
4pc: "Searing Moon" (Quantum)
Effect: After breaking an enemy, gains 20% ATK% and 20% EM (Energy Multiplier) for 2 turns.
💡 Best for: Enemies with high defense or shields, especially in Abyss floors or hard mode.
🔥 High-Efficiency Set (if you need more CDR/ER)
4pc: "The Wasted Heir" (Quantum)
4pc: "The Wasted Heir" (Quantum) + 2pc: "Searing Moon" (if you're struggling with CDR/ER)
✅ Use 2pc: "The Wasted Heir" + 2pc: "Searing Moon" only if you're maxing CDR and want extra EM for Weakness Break.
🛡️ Auras (Emblems) – Aura Selection
Note: Auras (Emblems) are passive traits that enhance stats based on character level, rank, and talent level.
✅ Best Aura (Maximize Burst Damage)
Emblem: "The Wasted Heir" (Quantum)
Effect: After using an Elemental Burst, gain +30% ATK% and +30% SPD for 1 turn.
Why: Directly increases damage output on burst turn.
✅ Best for: Single-target burst, boss fights, and hard-mode Abyss.
🔁 Alternative Auras
Emblem: "The Wasted Heir" (Quantum) + 2pc: "Searing Moon" (if you want EM boost on Break)
Emblem: "Searing Moon" (Quantum)
Effect: After breaking an enemy, gain +20% ATK% and +20% EM for 2 turns.
⚠️ Use this only if you're fighting enemies with high defense or shields.
🧩 Talent Priorities
Ultimate (Burst): Max as #1 priority (most damage output).
Normal Attack: Max to maintain energy and for sub-ability usage.
Skill: Max only if it provides useful utility (e.g., energy regeneration, shield, or status effect).
Evasion/Defensive Skills: Usually not prioritized unless you’re in a very hard mode or need survivability.
✅ Golden Rule: Burst > Normal Attack > Skill
🎮 Team Synergy Tips
Support Pairing:
Use a Quantum Break DPS (e.g., Acheron, Yanqing) to trigger Weakness Breaks.
Pair with a Debuff/DoT support (e.g., Herta, Pela, Fu Hua) to extend burst uptime.
Include a CDR or ER support (e.g., Machina, Setaria) to enable faster bursts.
Energy Management:
Use characters like Sampo (if available) or Luka to regenerate energy fast.
Perfect Turn Order:
Place Heirs after your energy regenerator or support, so they can burst immediately.
📊 Final Build Summary
Stat
Target
Notes
Main Stat
ATK% (if using 4pc The Wasted Heir)
Otherwise CR or CD
Sub-Stats
CR > CD > ER > ATK% > SPD
Prioritize CR/CD balance
Artifacts
4pc "The Wasted Heir" (Quantum)
Best for burst damage
Emblems
"The Wasted Heir" (Quantum)
Boosts burst damage
Talents
Ultimate > Normal Attack > Skill
Max Ultimate first
🏁 Final Thoughts
Abyss's Chosen Heirs shines in high-damage burst fights, especially against bosses, elite enemies, and Abyss floors.
"The Wasted Heir" set + 4pc emblem is unmatched for Quantum DPS in 5-star tier.
Prioritize CR/CD balance, ER for energy sustainability, and team synergy.
✨ Pro Tip: Use "Quantum" or "Break" decks to maximize Weakness Break and burst damage synergy.
If you have a specific version of Abyss's Chosen Heirs (e.g., Acheron, Yanqing, or another name), let me know and I’ll tailor the guide exactly to that character.
Stay strong, Trailblazer. The Abyss awaits. 🌑⚔️" onerror="this.onerror='';this.src='/assets/images/morentu/200-200.png'" uk-cover>