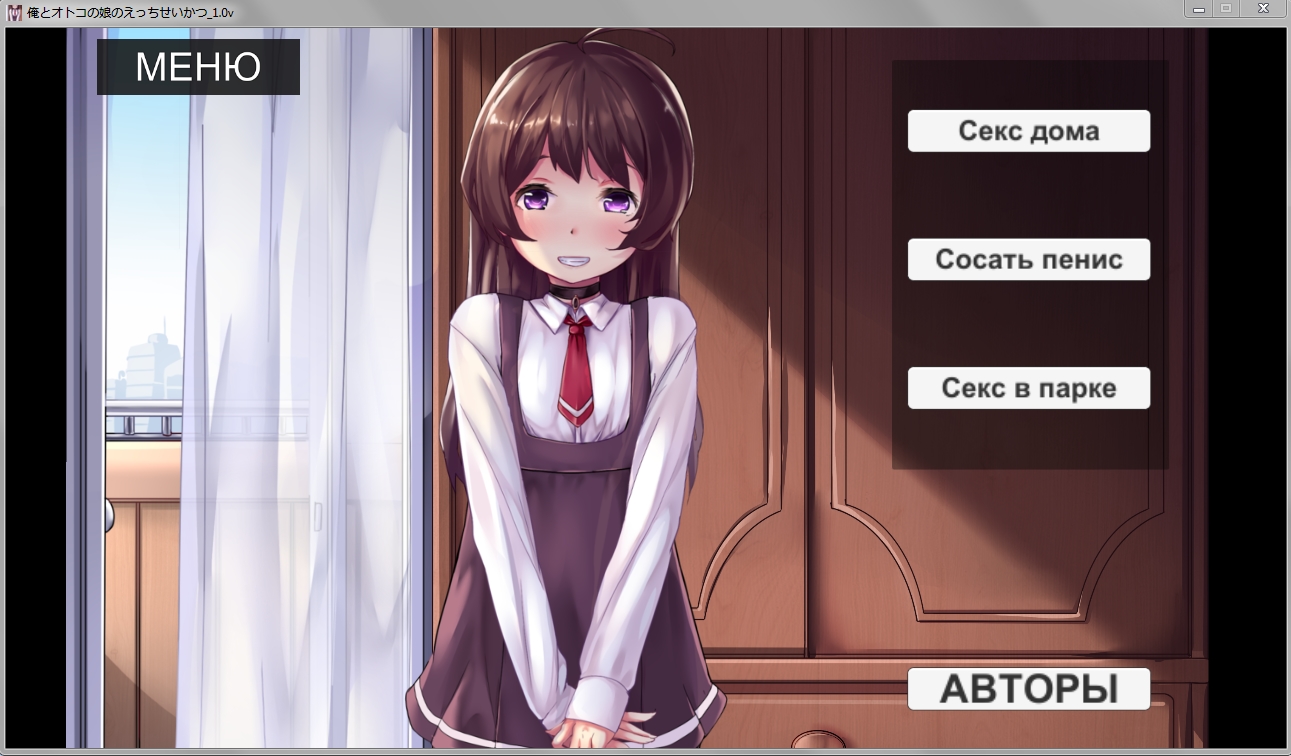
Experimenta un mundo de diversión infinita y dulce intimidad con una encantadora otoko no ko en My H-Life with an Otokonoko. Abraza al adorable y juvenil niño mientras te embarcas en un viaje encantador, donde el único límite es el puro placer. Aquí no hay límites ni finales, sólo una encantadora búsqueda de la felicidad. Con cada toque y caricia, serás testigo del aumento del nivel de placer del otoko no ko, que culminará en un clímax inolvidable. Prepárate para sumergirte en un juego adictivo que celebra la belleza del amor y la conexión, dejándote deseando momentos más íntimos. Prepárate para disfrutar de esta encantadora aplicación que da vida al amor y al placer.
Características de My H-Life with an Otokonoko:
❤️ Minijuego amoroso: participa en un encantador minijuego lleno de momentos afectuosos que garantiza una experiencia conmovedora.
❤️ Lindo otoko no ko: interactúa y crea vínculos con una adorable niña, agregando un toque encantador y único al juego.
❤️ Juego sin fin: disfruta del juego sin límites ni restricciones, ya que no hay un final fijo, lo que te permite disfrutar de la experiencia todo el tiempo que desees.
❤️ Mecánica basada en el placer: explora un enfoque novedoso de los juegos donde el nivel de placer del niño afecta directamente el juego y, en última instancia, conduce a un resultado satisfactorio.
❤️ Recompensas orgásmicas: a medida que progreses y actives mayores niveles de placer, serás recompensado con excitantes respuestas orgásmicas, creando una experiencia de juego emocionante y placentera.
❤️ Interfaz fácil de usar: navega por el juego sin esfuerzo con una interfaz fácil de usar, lo que garantiza una experiencia de juego fluida y agradable.
Conclusión:
Sumérgete en este cautivador minijuego donde podrás expresar amor y ternura hacia una encantadora otoko no ko. Con una jugabilidad infinita, mecánicas basadas en el placer y respuestas orgásmicas gratificantes, esta aplicación ofrece una experiencia íntima y emocionante. Deléitese con la ternura y disfrute de la interfaz fácil de usar que garantiza una navegación sin esfuerzo. ¡Disfruta de esta aventura de juego única haciendo clic para descargar My H-Life with an Otokonoko ahora!
Etiquetas : Casual
CD > ER > ATK% > Speed (only if needed for turn order)
❌ Avoid: HP%, DEF%, Healing Bonus (unless for a niche support role)
2. Artifact Sets (Recommended)
✅ Best Set (High Burst DPS)
2pc: "The Wasted Heir" (Quantum)
4pc: "The Wasted Heir" (Quantum)
Effect: After using an Elemental Burst, gain 30% ATK% and 30% SPD for 1 turn. This stacks up to 2 times.
💡 Why it’s great: Massive burst boost, perfect for a Quantum DPS. The 30% ATK% and SPD boost dramatically increases damage on burst turn.
⚠️ Note: Requires 2-stack management (use burst, then use another ability to refresh the buff). You’ll want to use burst, then normal attack to maintain uptime.
🔁 Alternative (if "The Wasted Heir" not available)
2pc: "Searing Moon" (Quantum)
2pc: "Stalwart and Sojourner" (Quantum)
4pc: "Searing Moon" (Quantum)
Effect: After breaking an enemy, gains 20% ATK% and 20% EM (Energy Multiplier) for 2 turns.
💡 Best for: Enemies with high defense or shields, especially in Abyss floors or hard mode.
🔥 High-Efficiency Set (if you need more CDR/ER)
4pc: "The Wasted Heir" (Quantum)
4pc: "The Wasted Heir" (Quantum) + 2pc: "Searing Moon" (if you're struggling with CDR/ER)
✅ Use 2pc: "The Wasted Heir" + 2pc: "Searing Moon" only if you're maxing CDR and want extra EM for Weakness Break.
🛡️ Auras (Emblems) – Aura Selection
Note: Auras (Emblems) are passive traits that enhance stats based on character level, rank, and talent level.
✅ Best Aura (Maximize Burst Damage)
Emblem: "The Wasted Heir" (Quantum)
Effect: After using an Elemental Burst, gain +30% ATK% and +30% SPD for 1 turn.
Why: Directly increases damage output on burst turn.
✅ Best for: Single-target burst, boss fights, and hard-mode Abyss.
🔁 Alternative Auras
Emblem: "The Wasted Heir" (Quantum) + 2pc: "Searing Moon" (if you want EM boost on Break)
Emblem: "Searing Moon" (Quantum)
Effect: After breaking an enemy, gain +20% ATK% and +20% EM for 2 turns.
⚠️ Use this only if you're fighting enemies with high defense or shields.
🧩 Talent Priorities
Ultimate (Burst): Max as #1 priority (most damage output).
Normal Attack: Max to maintain energy and for sub-ability usage.
Skill: Max only if it provides useful utility (e.g., energy regeneration, shield, or status effect).
Evasion/Defensive Skills: Usually not prioritized unless you’re in a very hard mode or need survivability.
✅ Golden Rule: Burst > Normal Attack > Skill
🎮 Team Synergy Tips
Support Pairing:
Use a Quantum Break DPS (e.g., Acheron, Yanqing) to trigger Weakness Breaks.
Pair with a Debuff/DoT support (e.g., Herta, Pela, Fu Hua) to extend burst uptime.
Include a CDR or ER support (e.g., Machina, Setaria) to enable faster bursts.
Energy Management:
Use characters like Sampo (if available) or Luka to regenerate energy fast.
Perfect Turn Order:
Place Heirs after your energy regenerator or support, so they can burst immediately.
📊 Final Build Summary
Stat
Target
Notes
Main Stat
ATK% (if using 4pc The Wasted Heir)
Otherwise CR or CD
Sub-Stats
CR > CD > ER > ATK% > SPD
Prioritize CR/CD balance
Artifacts
4pc "The Wasted Heir" (Quantum)
Best for burst damage
Emblems
"The Wasted Heir" (Quantum)
Boosts burst damage
Talents
Ultimate > Normal Attack > Skill
Max Ultimate first
🏁 Final Thoughts
Abyss's Chosen Heirs shines in high-damage burst fights, especially against bosses, elite enemies, and Abyss floors.
"The Wasted Heir" set + 4pc emblem is unmatched for Quantum DPS in 5-star tier.
Prioritize CR/CD balance, ER for energy sustainability, and team synergy.
✨ Pro Tip: Use "Quantum" or "Break" decks to maximize Weakness Break and burst damage synergy.
If you have a specific version of Abyss's Chosen Heirs (e.g., Acheron, Yanqing, or another name), let me know and I’ll tailor the guide exactly to that character.
Stay strong, Trailblazer. The Abyss awaits. 🌑⚔️" onerror="this.onerror='';this.src='/assets/images/morentu/200-200.png'" uk-cover>