Hogar Aplicaciones Vida de moda バスNAVITIMEー時刻表・乗り換え・接近情報(バスナビ)
バスNAVITIMEー時刻表・乗り換え・接近情報(バスナビ)

バスNAVITIMEー時刻表・乗り換え・接近情報(バスナビ)

Vida de moda
4.5
Descripción
¿Está planeando explorar Japón utilizando su extenso sistema de autobuses? La aplicación Navitime Bus Transit Japan es su guía final para dominar los viajes en autobuses en Japón. Esta aplicación ofrece una solución que lo abarca para verificar las tarifas de los autobuses, los horarios y la planificación de sus rutas con facilidad. Ya sea que esté abordando un autobús local, un servicio de alta velocidad o un transporte del aeropuerto, encontrará todos los detalles necesarios al alcance de su alcance. Es la herramienta perfecta para los viajeros ansiosos por sumergirse en una auténtica experiencia japonesa, haciendo que los viajes en autobús sean directamente y agradables, incluso si no habla el idioma.

Características de Navitime Bus Transit Japan:

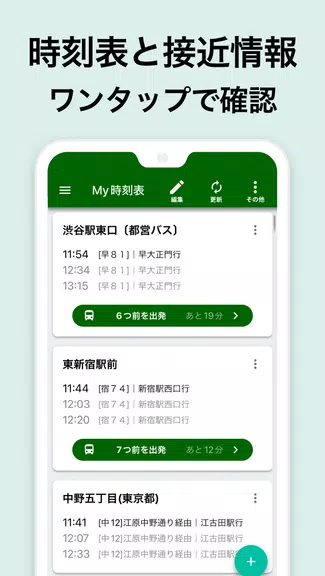
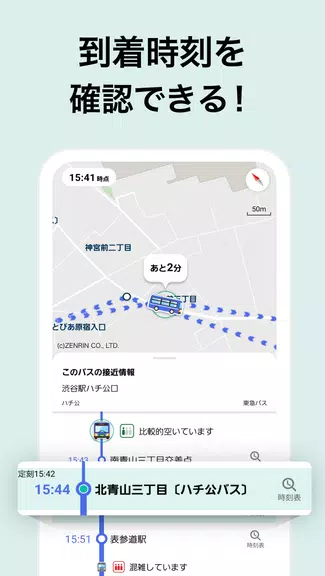
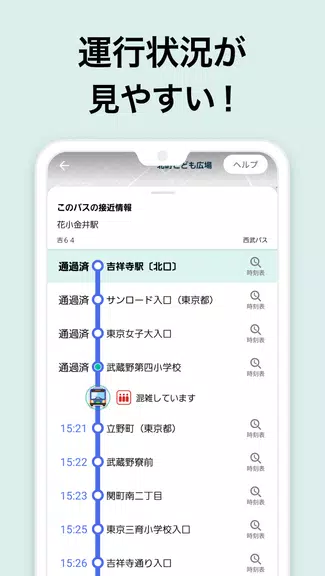
Información completa: Navitime Bus Transit Japan equipa a los usuarios con información detallada sobre rutas de autobuses, tarifas y horarios. Esta gran cantidad de información asegura que pueda planificar y navegar su viaje sin problemas.

Búsqueda de transferencia fácil: la función de búsqueda de transferencia de la aplicación simplifica el cambio entre diferentes rutas de bus, mejorando su experiencia de viaje al hacerlo suave y eficiente.

Servicio de transporte del aeropuerto: más allá de los autobuses locales y de alta velocidad, Navitime Bus Transit Japan también incluye servicios de transporte del aeropuerto, lo que lo convierte en un brisa para que los viajeros lleguen a su destino a su llegada.

Experiencia local: ideal para aquellos que desean sumergirse en la cultura local, esta aplicación apoya explorar Japón desde una perspectiva única a través de su sistema de transporte público.

Consejos para usuarios:

Explore diferentes rutas: utilice la función de búsqueda de transferencia para encontrar rutas nuevas y eficientes para sus viajes, ya sea dentro de una ciudad o entre regiones.

Verifique los horarios del bus: Planifique su viaje con anticipación revisando los horarios de los autobuses en el tránsito de autobuses Navitime Japón. Esto ayuda a evitar demoras y asegura que llegue a tiempo.

Guarde las rutas favoritas: guarde sus rutas de autobuses preferidas en la aplicación para un acceso rápido en el futuro, agregando conveniencia y eficiencia a sus viajes.

Conclusión:

Navitime Bus Transit Japan se destaca como una plataforma fácil de usar diseñada para simplificar la navegación de la red de autobuses de Japón. Con características que van desde búsquedas de transferencia hasta servicios de transporte del aeropuerto, atiende a una amplia gama de viajeros interesados ​​en explorar Japón a través del transporte público. Al aprovechar las características de la aplicación y seguir los consejos proporcionados, los usuarios pueden maximizar su experiencia de viaje en autobús y mejorar su viaje general a través de Japón. Descargue la aplicación hoy y empiece a una aventura perfecta y agradable en todo el sistema de tránsito de autobuses de Japón.

Etiquetas : Estilo de vida

バスNAVITIMEー時刻表・乗り換え・接近情報(バスナビ) capturas de pantalla
  • バスNAVITIMEー時刻表・乗り換え・接近情報(バスナビ) Captura de pantalla 0
  • バスNAVITIMEー時刻表・乗り換え・接近情報(バスナビ) Captura de pantalla 1
  • バスNAVITIMEー時刻表・乗り換え・接近情報(バスナビ) Captura de pantalla 2
Últimos artículos
CD > ER > ATK% > Speed (only if needed for turn order) ❌ Avoid: HP%, DEF%, Healing Bonus (unless for a niche support role) 2. Artifact Sets (Recommended) ✅ Best Set (High Burst DPS) 2pc: "The Wasted Heir" (Quantum) 4pc: "The Wasted Heir" (Quantum) Effect: After using an Elemental Burst, gain 30% ATK% and 30% SPD for 1 turn. This stacks up to 2 times. 💡 Why it’s great: Massive burst boost, perfect for a Quantum DPS. The 30% ATK% and SPD boost dramatically increases damage on burst turn. ⚠️ Note: Requires 2-stack management (use burst, then use another ability to refresh the buff). You’ll want to use burst, then normal attack to maintain uptime. 🔁 Alternative (if "The Wasted Heir" not available) 2pc: "Searing Moon" (Quantum) 2pc: "Stalwart and Sojourner" (Quantum) 4pc: "Searing Moon" (Quantum) Effect: After breaking an enemy, gains 20% ATK% and 20% EM (Energy Multiplier) for 2 turns. 💡 Best for: Enemies with high defense or shields, especially in Abyss floors or hard mode. 🔥 High-Efficiency Set (if you need more CDR/ER) 4pc: "The Wasted Heir" (Quantum) 4pc: "The Wasted Heir" (Quantum) + 2pc: "Searing Moon" (if you're struggling with CDR/ER) ✅ Use 2pc: "The Wasted Heir" + 2pc: "Searing Moon" only if you're maxing CDR and want extra EM for Weakness Break. 🛡️ Auras (Emblems) – Aura Selection Note: Auras (Emblems) are passive traits that enhance stats based on character level, rank, and talent level. ✅ Best Aura (Maximize Burst Damage) Emblem: "The Wasted Heir" (Quantum) Effect: After using an Elemental Burst, gain +30% ATK% and +30% SPD for 1 turn. Why: Directly increases damage output on burst turn. ✅ Best for: Single-target burst, boss fights, and hard-mode Abyss. 🔁 Alternative Auras Emblem: "The Wasted Heir" (Quantum) + 2pc: "Searing Moon" (if you want EM boost on Break) Emblem: "Searing Moon" (Quantum) Effect: After breaking an enemy, gain +20% ATK% and +20% EM for 2 turns. ⚠️ Use this only if you're fighting enemies with high defense or shields. 🧩 Talent Priorities Ultimate (Burst): Max as #1 priority (most damage output). Normal Attack: Max to maintain energy and for sub-ability usage. Skill: Max only if it provides useful utility (e.g., energy regeneration, shield, or status effect). Evasion/Defensive Skills: Usually not prioritized unless you’re in a very hard mode or need survivability. ✅ Golden Rule: Burst > Normal Attack > Skill 🎮 Team Synergy Tips Support Pairing: Use a Quantum Break DPS (e.g., Acheron, Yanqing) to trigger Weakness Breaks. Pair with a Debuff/DoT support (e.g., Herta, Pela, Fu Hua) to extend burst uptime. Include a CDR or ER support (e.g., Machina, Setaria) to enable faster bursts. Energy Management: Use characters like Sampo (if available) or Luka to regenerate energy fast. Perfect Turn Order: Place Heirs after your energy regenerator or support, so they can burst immediately. 📊 Final Build Summary Stat Target Notes Main Stat ATK% (if using 4pc The Wasted Heir) Otherwise CR or CD Sub-Stats CR > CD > ER > ATK% > SPD Prioritize CR/CD balance Artifacts 4pc "The Wasted Heir" (Quantum) Best for burst damage Emblems "The Wasted Heir" (Quantum) Boosts burst damage Talents Ultimate > Normal Attack > Skill Max Ultimate first 🏁 Final Thoughts Abyss's Chosen Heirs shines in high-damage burst fights, especially against bosses, elite enemies, and Abyss floors. "The Wasted Heir" set + 4pc emblem is unmatched for Quantum DPS in 5-star tier. Prioritize CR/CD balance, ER for energy sustainability, and team synergy. ✨ Pro Tip: Use "Quantum" or "Break" decks to maximize Weakness Break and burst damage synergy. If you have a specific version of Abyss's Chosen Heirs (e.g., Acheron, Yanqing, or another name), let me know and I’ll tailor the guide exactly to that character. Stay strong, Trailblazer. The Abyss awaits. 🌑⚔️" > Certainly! Here's a comprehensive Stat and Aura Guide for Abyss's Chosen Heirs in Honkai: Star Rail, focusing on optimal builds, stat priorities, and aura (Emblem) selection to maximize damage, survivability, and team synergy.

🌑 Abyss's Chosen Heirs – Overview

Character: Abyss's Chosen Heirs (often known as Heirs or Herald of the Abyss, depending on version)
Path: Destruction (Damage-dealing, burst-focused)
Element: Quantum
Role: Main DPS / Burst Damage Dealer
Team Role: High burst, strong single-target damage, excels against bosses and elite enemies.


Note: This guide assumes you're using the 5-star Quantum DPS character with the signature CD > ER > ATK% > Speed (only if needed for turn order) ❌ Avoid: HP%, DEF%, Healing Bonus (unless for a niche support role) 2. Artifact Sets (Recommended) ✅ Best Set (High Burst DPS) 2pc: "The Wasted Heir" (Quantum) 4pc: "The Wasted Heir" (Quantum) Effect: After using an Elemental Burst, gain 30% ATK% and 30% SPD for 1 turn. This stacks up to 2 times. 💡 Why it’s great: Massive burst boost, perfect for a Quantum DPS. The 30% ATK% and SPD boost dramatically increases damage on burst turn. ⚠️ Note: Requires 2-stack management (use burst, then use another ability to refresh the buff). You’ll want to use burst, then normal attack to maintain uptime. 🔁 Alternative (if "The Wasted Heir" not available) 2pc: "Searing Moon" (Quantum) 2pc: "Stalwart and Sojourner" (Quantum) 4pc: "Searing Moon" (Quantum) Effect: After breaking an enemy, gains 20% ATK% and 20% EM (Energy Multiplier) for 2 turns. 💡 Best for: Enemies with high defense or shields, especially in Abyss floors or hard mode. 🔥 High-Efficiency Set (if you need more CDR/ER) 4pc: "The Wasted Heir" (Quantum) 4pc: "The Wasted Heir" (Quantum) + 2pc: "Searing Moon" (if you're struggling with CDR/ER) ✅ Use 2pc: "The Wasted Heir" + 2pc: "Searing Moon" only if you're maxing CDR and want extra EM for Weakness Break. 🛡️ Auras (Emblems) – Aura Selection Note: Auras (Emblems) are passive traits that enhance stats based on character level, rank, and talent level. ✅ Best Aura (Maximize Burst Damage) Emblem: "The Wasted Heir" (Quantum) Effect: After using an Elemental Burst, gain +30% ATK% and +30% SPD for 1 turn. Why: Directly increases damage output on burst turn. ✅ Best for: Single-target burst, boss fights, and hard-mode Abyss. 🔁 Alternative Auras Emblem: "The Wasted Heir" (Quantum) + 2pc: "Searing Moon" (if you want EM boost on Break) Emblem: "Searing Moon" (Quantum) Effect: After breaking an enemy, gain +20% ATK% and +20% EM for 2 turns. ⚠️ Use this only if you're fighting enemies with high defense or shields. 🧩 Talent Priorities Ultimate (Burst): Max as #1 priority (most damage output). Normal Attack: Max to maintain energy and for sub-ability usage. Skill: Max only if it provides useful utility (e.g., energy regeneration, shield, or status effect). Evasion/Defensive Skills: Usually not prioritized unless you’re in a very hard mode or need survivability. ✅ Golden Rule: Burst > Normal Attack > Skill 🎮 Team Synergy Tips Support Pairing: Use a Quantum Break DPS (e.g., Acheron, Yanqing) to trigger Weakness Breaks. Pair with a Debuff/DoT support (e.g., Herta, Pela, Fu Hua) to extend burst uptime. Include a CDR or ER support (e.g., Machina, Setaria) to enable faster bursts. Energy Management: Use characters like Sampo (if available) or Luka to regenerate energy fast. Perfect Turn Order: Place Heirs after your energy regenerator or support, so they can burst immediately. 📊 Final Build Summary Stat Target Notes Main Stat ATK% (if using 4pc The Wasted Heir) Otherwise CR or CD Sub-Stats CR > CD > ER > ATK% > SPD Prioritize CR/CD balance Artifacts 4pc "The Wasted Heir" (Quantum) Best for burst damage Emblems "The Wasted Heir" (Quantum) Boosts burst damage Talents Ultimate > Normal Attack > Skill Max Ultimate first 🏁 Final Thoughts Abyss's Chosen Heirs shines in high-damage burst fights, especially against bosses, elite enemies, and Abyss floors. "The Wasted Heir" set + 4pc emblem is unmatched for Quantum DPS in 5-star tier. Prioritize CR/CD balance, ER for energy sustainability, and team synergy. ✨ Pro Tip: Use "Quantum" or "Break" decks to maximize Weakness Break and burst damage synergy. If you have a specific version of Abyss's Chosen Heirs (e.g., Acheron, Yanqing, or another name), let me know and I’ll tailor the guide exactly to that character. Stay strong, Trailblazer. The Abyss awaits. 🌑⚔️" onerror="this.onerror='';this.src='/assets/images/morentu/200-200.png'" uk-cover>