Características clave de Skydemon:
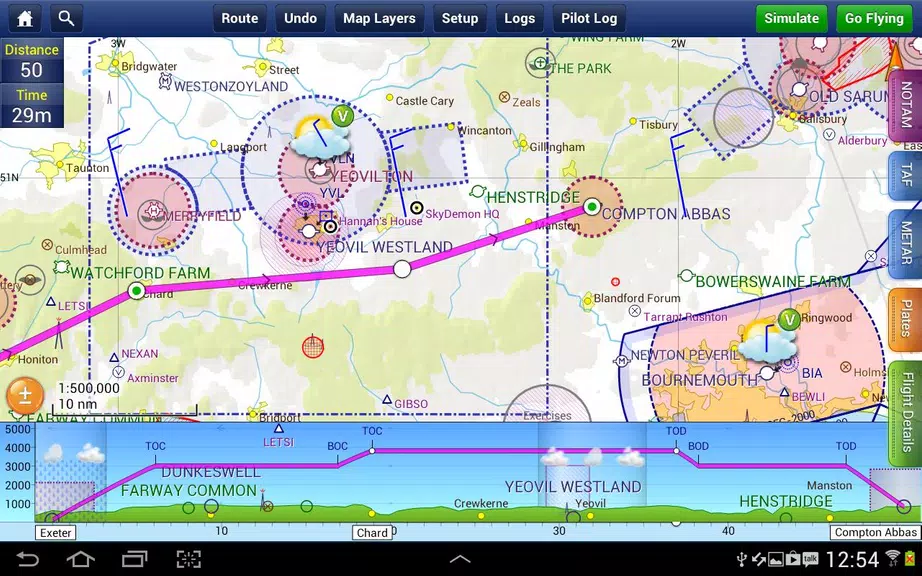
> Planificación avanzada de vuelo: Skydemon ofrece herramientas sofisticadas para la planificación de rutas, conciencia del espacio aéreo, sesiones de información meteorológica y más, optimizando su preparación de vuelo VFR.
> Gráficos de vectores de cristal: Experiencia gráficos aeronáuticos superiores con recorte dinámico del espacio aéreo, capas de mapas personalizables y manipulación intuitiva para la planificación de rutas sin problemas.
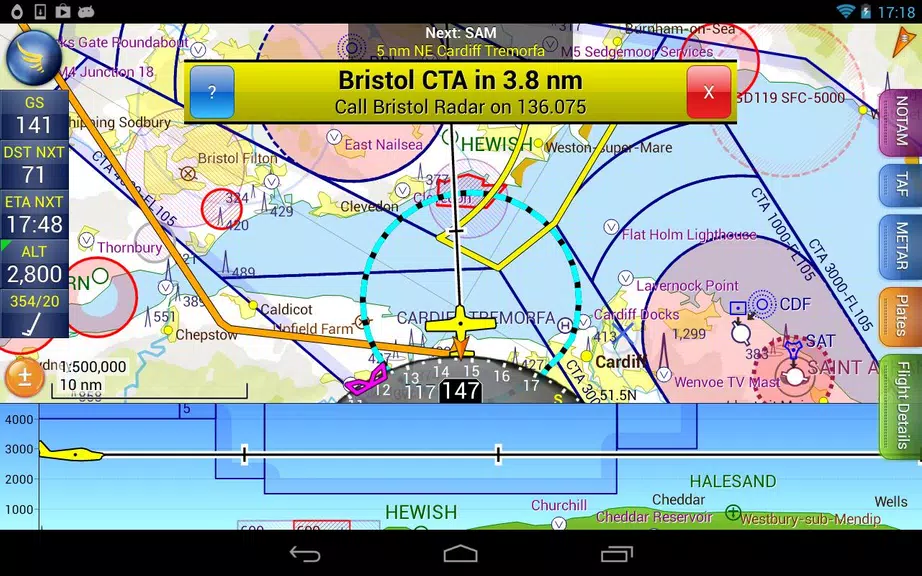
> Navegación inteligente en el vuelo: Mantenga la conciencia precisa de la ruta de vuelo con advertencias inteligentes de riesgos, radar virtual, estadísticas de vuelo detalladas y actualizaciones de datos en vivo para la toma de decisiones informadas en tiempo real.
> Interfaz de usuario intuitiva: disfrute de la navegación sin esfuerzo con las capacidades intuitivas de la bandeja intuitiva de la aplicación, pellizcos y zoom, preservando la claridad del mapa y la legibilidad de texto.
Preguntas frecuentes (preguntas frecuentes):
> ¿ Capacidad fuera de línea? Sí, descargue gráficos y datos para obtener acceso fuera de línea a información crítica durante su vuelo.
> ¿ Nivel de experiencia? Skydemon atiende a pilotos de todos los niveles de habilidad, ofreciendo características personalizables y herramientas integrales para satisfacer las necesidades individuales.
> ¿ Frecuencia de actualización de datos? Skydemon recibe actualizaciones frecuentes y alimentos de datos en tiempo real, garantizando un espacio aéreo preciso, clima y otra información de vuelo esencial.
Resumen:
Skydemon es indispensable para los pilotos VFR, proporcionando una planificación de vuelo incomparable y herramientas de navegación en vuelo. Su diseño fácil de usar, gráficos vectoriales de alta calidad, navegación GPS inteligente y actualizaciones continuas simplifican las complejidades del vuelo, mejorando la seguridad y la eficiencia. Ya sea que sea un piloto experimentado o que comience su viaje, Skydemon permite la navegación segura y sin esfuerzo. Descargue hoy y transforme su experiencia de vuelo.
Etiquetas : Estilo de vida
CD > ER > ATK% > Speed (only if needed for turn order)
❌ Avoid: HP%, DEF%, Healing Bonus (unless for a niche support role)
2. Artifact Sets (Recommended)
✅ Best Set (High Burst DPS)
2pc: "The Wasted Heir" (Quantum)
4pc: "The Wasted Heir" (Quantum)
Effect: After using an Elemental Burst, gain 30% ATK% and 30% SPD for 1 turn. This stacks up to 2 times.
💡 Why it’s great: Massive burst boost, perfect for a Quantum DPS. The 30% ATK% and SPD boost dramatically increases damage on burst turn.
⚠️ Note: Requires 2-stack management (use burst, then use another ability to refresh the buff). You’ll want to use burst, then normal attack to maintain uptime.
🔁 Alternative (if "The Wasted Heir" not available)
2pc: "Searing Moon" (Quantum)
2pc: "Stalwart and Sojourner" (Quantum)
4pc: "Searing Moon" (Quantum)
Effect: After breaking an enemy, gains 20% ATK% and 20% EM (Energy Multiplier) for 2 turns.
💡 Best for: Enemies with high defense or shields, especially in Abyss floors or hard mode.
🔥 High-Efficiency Set (if you need more CDR/ER)
4pc: "The Wasted Heir" (Quantum)
4pc: "The Wasted Heir" (Quantum) + 2pc: "Searing Moon" (if you're struggling with CDR/ER)
✅ Use 2pc: "The Wasted Heir" + 2pc: "Searing Moon" only if you're maxing CDR and want extra EM for Weakness Break.
🛡️ Auras (Emblems) – Aura Selection
Note: Auras (Emblems) are passive traits that enhance stats based on character level, rank, and talent level.
✅ Best Aura (Maximize Burst Damage)
Emblem: "The Wasted Heir" (Quantum)
Effect: After using an Elemental Burst, gain +30% ATK% and +30% SPD for 1 turn.
Why: Directly increases damage output on burst turn.
✅ Best for: Single-target burst, boss fights, and hard-mode Abyss.
🔁 Alternative Auras
Emblem: "The Wasted Heir" (Quantum) + 2pc: "Searing Moon" (if you want EM boost on Break)
Emblem: "Searing Moon" (Quantum)
Effect: After breaking an enemy, gain +20% ATK% and +20% EM for 2 turns.
⚠️ Use this only if you're fighting enemies with high defense or shields.
🧩 Talent Priorities
Ultimate (Burst): Max as #1 priority (most damage output).
Normal Attack: Max to maintain energy and for sub-ability usage.
Skill: Max only if it provides useful utility (e.g., energy regeneration, shield, or status effect).
Evasion/Defensive Skills: Usually not prioritized unless you’re in a very hard mode or need survivability.
✅ Golden Rule: Burst > Normal Attack > Skill
🎮 Team Synergy Tips
Support Pairing:
Use a Quantum Break DPS (e.g., Acheron, Yanqing) to trigger Weakness Breaks.
Pair with a Debuff/DoT support (e.g., Herta, Pela, Fu Hua) to extend burst uptime.
Include a CDR or ER support (e.g., Machina, Setaria) to enable faster bursts.
Energy Management:
Use characters like Sampo (if available) or Luka to regenerate energy fast.
Perfect Turn Order:
Place Heirs after your energy regenerator or support, so they can burst immediately.
📊 Final Build Summary
Stat
Target
Notes
Main Stat
ATK% (if using 4pc The Wasted Heir)
Otherwise CR or CD
Sub-Stats
CR > CD > ER > ATK% > SPD
Prioritize CR/CD balance
Artifacts
4pc "The Wasted Heir" (Quantum)
Best for burst damage
Emblems
"The Wasted Heir" (Quantum)
Boosts burst damage
Talents
Ultimate > Normal Attack > Skill
Max Ultimate first
🏁 Final Thoughts
Abyss's Chosen Heirs shines in high-damage burst fights, especially against bosses, elite enemies, and Abyss floors.
"The Wasted Heir" set + 4pc emblem is unmatched for Quantum DPS in 5-star tier.
Prioritize CR/CD balance, ER for energy sustainability, and team synergy.
✨ Pro Tip: Use "Quantum" or "Break" decks to maximize Weakness Break and burst damage synergy.
If you have a specific version of Abyss's Chosen Heirs (e.g., Acheron, Yanqing, or another name), let me know and I’ll tailor the guide exactly to that character.
Stay strong, Trailblazer. The Abyss awaits. 🌑⚔️" onerror="this.onerror='';this.src='/assets/images/morentu/200-200.png'" uk-cover>