¡Compite por zonas con amigos y extraños en la vida real!
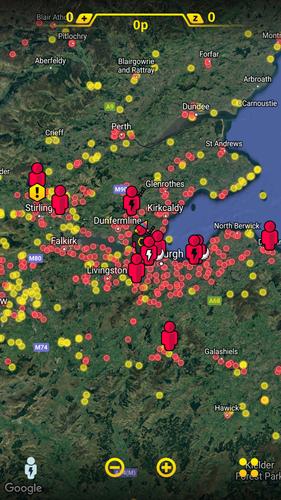
En Turf, hay numerosas ZONAS repartidas por todo el mundo. Compites por estas zonas contra otras para progresar en el juego.
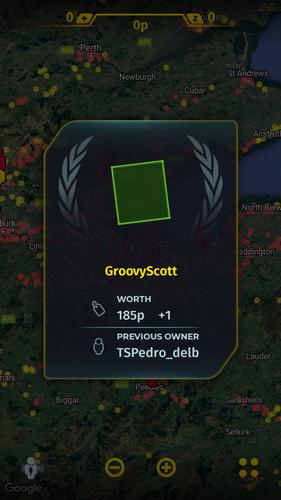
Al visitar una zona y permanecer dentro de sus límites, le quitas la zona a su propietario actual y la reclamas como tuya. Esta acción hace que la zona se vuelva verde y te genera ingresos en forma de puntos.
Monitorea los movimientos de tus oponentes EN VIVO en el mapa del juego y ajusta tu estrategia en consecuencia. Adquirir más zonas aumenta tus ingresos, mientras que perder una zona frente a un rival los disminuye. Su clasificación actual se muestra en tres niveles de listas principales (región/país/mundo).
El juego se juega en RONDAS, cada una de las cuales dura un mes y concluye un domingo cerca del inicio del mes siguiente. Al final de una ronda, todas las zonas se reinician y los puntos acumulados se ponen a cero, lo que permite un nuevo comienzo. Los jugadores con mejor desempeño reciben recompensas que se retienen permanentemente.
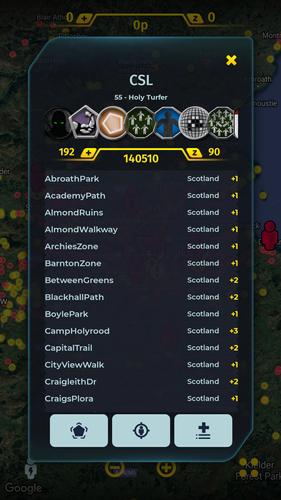
El juego también incluye eventos, medallas, clasificaciones y datos estadísticos extensos para realizar un seguimiento de tu desempeño y documentar tus aventuras.
¡Empiece a hacer Turfahora! ¡Muévete y deja que la adrenalina suba!
Novedades de la última versión 2.1.21
Última actualización el 21 de noviembre de 2023
2.1.21
- Ubicación de fondo fija para ciertos dispositivos
- Zona de corrección de cámara
2.1.20
- Implementamos las versiones mínimas requeridas de Google.
2.1.18 - 2.1.19
- Actualizaciones de equipos
- Nuevas series de medallas de equipos, Turf Equipos Indy
2.1.17
- Four nuevos equipos
- Medallas
- Mejoras menores
2.1.12 - 2.1.16
- Corrección de errores
- Varias mejoras
2.1.11
- Nueva serie de medallas, "Diario": Otorgada a quienes realizan 5 adquisiciones diarias durante x días consecutivos
2.1.10
- Corrección de errores de eventos
Etiquetas : Deportes
CD > ER > ATK% > Speed (only if needed for turn order)
❌ Avoid: HP%, DEF%, Healing Bonus (unless for a niche support role)
2. Artifact Sets (Recommended)
✅ Best Set (High Burst DPS)
2pc: "The Wasted Heir" (Quantum)
4pc: "The Wasted Heir" (Quantum)
Effect: After using an Elemental Burst, gain 30% ATK% and 30% SPD for 1 turn. This stacks up to 2 times.
💡 Why it’s great: Massive burst boost, perfect for a Quantum DPS. The 30% ATK% and SPD boost dramatically increases damage on burst turn.
⚠️ Note: Requires 2-stack management (use burst, then use another ability to refresh the buff). You’ll want to use burst, then normal attack to maintain uptime.
🔁 Alternative (if "The Wasted Heir" not available)
2pc: "Searing Moon" (Quantum)
2pc: "Stalwart and Sojourner" (Quantum)
4pc: "Searing Moon" (Quantum)
Effect: After breaking an enemy, gains 20% ATK% and 20% EM (Energy Multiplier) for 2 turns.
💡 Best for: Enemies with high defense or shields, especially in Abyss floors or hard mode.
🔥 High-Efficiency Set (if you need more CDR/ER)
4pc: "The Wasted Heir" (Quantum)
4pc: "The Wasted Heir" (Quantum) + 2pc: "Searing Moon" (if you're struggling with CDR/ER)
✅ Use 2pc: "The Wasted Heir" + 2pc: "Searing Moon" only if you're maxing CDR and want extra EM for Weakness Break.
🛡️ Auras (Emblems) – Aura Selection
Note: Auras (Emblems) are passive traits that enhance stats based on character level, rank, and talent level.
✅ Best Aura (Maximize Burst Damage)
Emblem: "The Wasted Heir" (Quantum)
Effect: After using an Elemental Burst, gain +30% ATK% and +30% SPD for 1 turn.
Why: Directly increases damage output on burst turn.
✅ Best for: Single-target burst, boss fights, and hard-mode Abyss.
🔁 Alternative Auras
Emblem: "The Wasted Heir" (Quantum) + 2pc: "Searing Moon" (if you want EM boost on Break)
Emblem: "Searing Moon" (Quantum)
Effect: After breaking an enemy, gain +20% ATK% and +20% EM for 2 turns.
⚠️ Use this only if you're fighting enemies with high defense or shields.
🧩 Talent Priorities
Ultimate (Burst): Max as #1 priority (most damage output).
Normal Attack: Max to maintain energy and for sub-ability usage.
Skill: Max only if it provides useful utility (e.g., energy regeneration, shield, or status effect).
Evasion/Defensive Skills: Usually not prioritized unless you’re in a very hard mode or need survivability.
✅ Golden Rule: Burst > Normal Attack > Skill
🎮 Team Synergy Tips
Support Pairing:
Use a Quantum Break DPS (e.g., Acheron, Yanqing) to trigger Weakness Breaks.
Pair with a Debuff/DoT support (e.g., Herta, Pela, Fu Hua) to extend burst uptime.
Include a CDR or ER support (e.g., Machina, Setaria) to enable faster bursts.
Energy Management:
Use characters like Sampo (if available) or Luka to regenerate energy fast.
Perfect Turn Order:
Place Heirs after your energy regenerator or support, so they can burst immediately.
📊 Final Build Summary
Stat
Target
Notes
Main Stat
ATK% (if using 4pc The Wasted Heir)
Otherwise CR or CD
Sub-Stats
CR > CD > ER > ATK% > SPD
Prioritize CR/CD balance
Artifacts
4pc "The Wasted Heir" (Quantum)
Best for burst damage
Emblems
"The Wasted Heir" (Quantum)
Boosts burst damage
Talents
Ultimate > Normal Attack > Skill
Max Ultimate first
🏁 Final Thoughts
Abyss's Chosen Heirs shines in high-damage burst fights, especially against bosses, elite enemies, and Abyss floors.
"The Wasted Heir" set + 4pc emblem is unmatched for Quantum DPS in 5-star tier.
Prioritize CR/CD balance, ER for energy sustainability, and team synergy.
✨ Pro Tip: Use "Quantum" or "Break" decks to maximize Weakness Break and burst damage synergy.
If you have a specific version of Abyss's Chosen Heirs (e.g., Acheron, Yanqing, or another name), let me know and I’ll tailor the guide exactly to that character.
Stay strong, Trailblazer. The Abyss awaits. 🌑⚔️" onerror="this.onerror='';this.src='/assets/images/morentu/200-200.png'" uk-cover>