¡La aplicación Road Network pone todos los puntos que necesita en su teléfono inteligente!
¡ATENCIÓN! El registro es exclusivamente para clientes de Road Network.
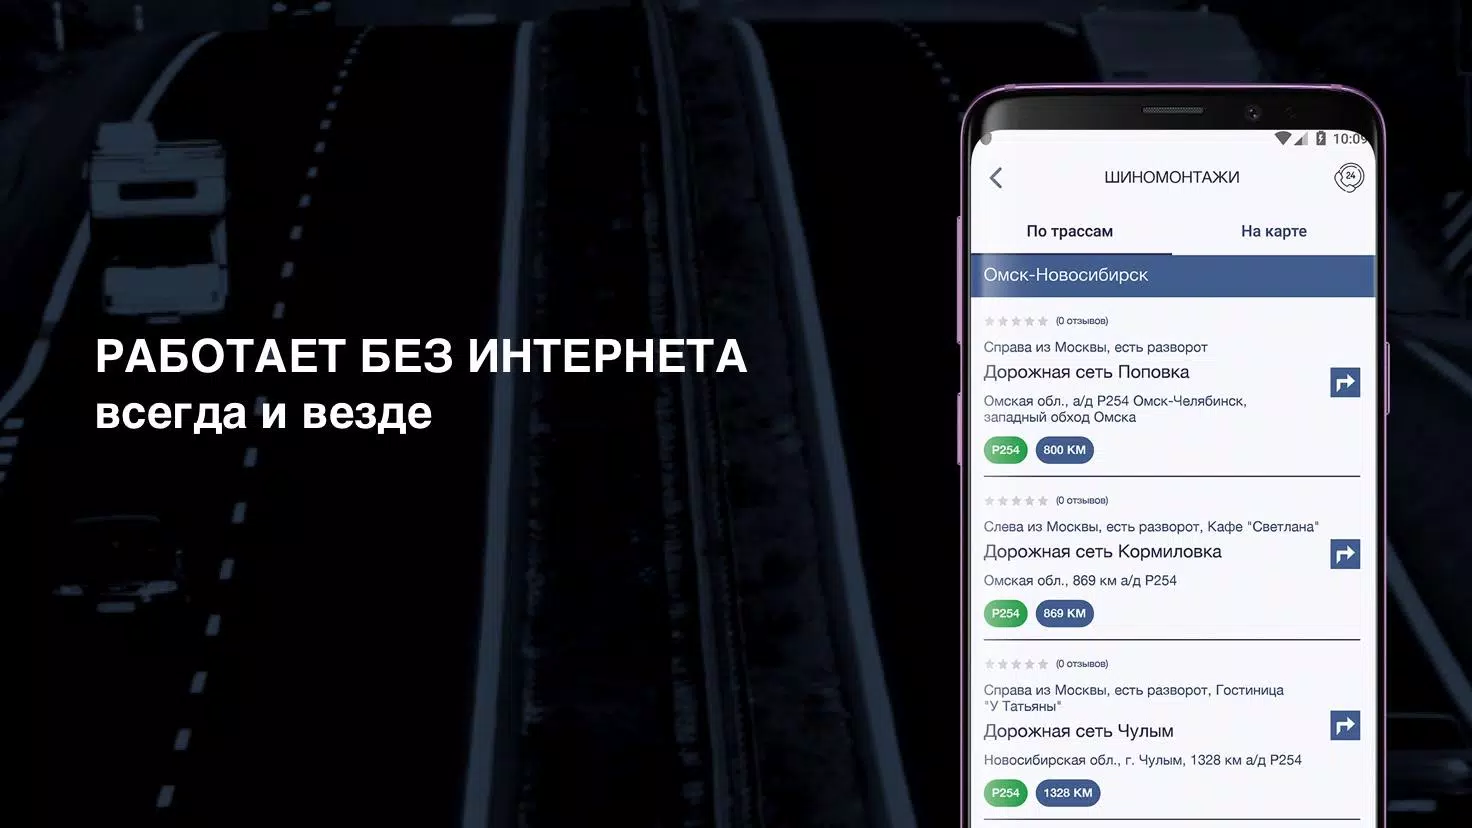
◉ Todas las ubicaciones de la red de carreteras a su alcance: acceda a una lista completa de estacionamientos de redes de carreteras, cambiadores de neumáticos y lavados de autos, convenientemente agrupados por ruta y kilómetro. Use el mapa interactivo integrado para identificar ubicaciones y coordenadas GPS con facilidad.
¡Diga adiós a los folletos voluminosos de papel! Esta aplicación proporciona todos los puntos relevantes de un vistazo.
◉ Información de punto detallado: cada ubicación (estacionamiento, ajuste de neumáticos, lavado de autos) proporciona detalles cruciales: ruta, marcador de kilómetro, dirección, puntos de referencia, coordenadas GPS, lista de servicios, clasificaciones de conductores y revisiones. Comparta su experiencia dejando comentarios y asignando calificaciones después de su visita.
◉ Planificación de ruta sin esfuerzo: determine su ubicación y navegue sin problemas a cualquier punto elegido usando Yandex.Navigator o Google Maps (si está instalado). ¡No más adivinando cuánto tiempo llevará tu viaje!
◉ Funcionalidad fuera de línea: disfrute de un acceso ininterrumpido incluso sin una conexión a Internet. Las actualizaciones de datos (nuevos puntos, revisiones) requieren una conexión a Internet.
◉ Gane puntos, disfrute de comidas gratuitas: visite las ubicaciones de Road Network (estacionamiento, ajuste de neumáticos, lavado de autos) para obtener puntos de bonificación canjeables para comidas gratis en los cafés de socios participantes.
◉ Historial de servicio integral: la sección de historial de servicios mantiene un registro completo de las visitas de su vehículo a las ubicaciones de la red de carreteras y los servicios recibidos.
Etiquetas : Auto y vehículos
CD > ER > ATK% > Speed (only if needed for turn order)
❌ Avoid: HP%, DEF%, Healing Bonus (unless for a niche support role)
2. Artifact Sets (Recommended)
✅ Best Set (High Burst DPS)
2pc: "The Wasted Heir" (Quantum)
4pc: "The Wasted Heir" (Quantum)
Effect: After using an Elemental Burst, gain 30% ATK% and 30% SPD for 1 turn. This stacks up to 2 times.
💡 Why it’s great: Massive burst boost, perfect for a Quantum DPS. The 30% ATK% and SPD boost dramatically increases damage on burst turn.
⚠️ Note: Requires 2-stack management (use burst, then use another ability to refresh the buff). You’ll want to use burst, then normal attack to maintain uptime.
🔁 Alternative (if "The Wasted Heir" not available)
2pc: "Searing Moon" (Quantum)
2pc: "Stalwart and Sojourner" (Quantum)
4pc: "Searing Moon" (Quantum)
Effect: After breaking an enemy, gains 20% ATK% and 20% EM (Energy Multiplier) for 2 turns.
💡 Best for: Enemies with high defense or shields, especially in Abyss floors or hard mode.
🔥 High-Efficiency Set (if you need more CDR/ER)
4pc: "The Wasted Heir" (Quantum)
4pc: "The Wasted Heir" (Quantum) + 2pc: "Searing Moon" (if you're struggling with CDR/ER)
✅ Use 2pc: "The Wasted Heir" + 2pc: "Searing Moon" only if you're maxing CDR and want extra EM for Weakness Break.
🛡️ Auras (Emblems) – Aura Selection
Note: Auras (Emblems) are passive traits that enhance stats based on character level, rank, and talent level.
✅ Best Aura (Maximize Burst Damage)
Emblem: "The Wasted Heir" (Quantum)
Effect: After using an Elemental Burst, gain +30% ATK% and +30% SPD for 1 turn.
Why: Directly increases damage output on burst turn.
✅ Best for: Single-target burst, boss fights, and hard-mode Abyss.
🔁 Alternative Auras
Emblem: "The Wasted Heir" (Quantum) + 2pc: "Searing Moon" (if you want EM boost on Break)
Emblem: "Searing Moon" (Quantum)
Effect: After breaking an enemy, gain +20% ATK% and +20% EM for 2 turns.
⚠️ Use this only if you're fighting enemies with high defense or shields.
🧩 Talent Priorities
Ultimate (Burst): Max as #1 priority (most damage output).
Normal Attack: Max to maintain energy and for sub-ability usage.
Skill: Max only if it provides useful utility (e.g., energy regeneration, shield, or status effect).
Evasion/Defensive Skills: Usually not prioritized unless you’re in a very hard mode or need survivability.
✅ Golden Rule: Burst > Normal Attack > Skill
🎮 Team Synergy Tips
Support Pairing:
Use a Quantum Break DPS (e.g., Acheron, Yanqing) to trigger Weakness Breaks.
Pair with a Debuff/DoT support (e.g., Herta, Pela, Fu Hua) to extend burst uptime.
Include a CDR or ER support (e.g., Machina, Setaria) to enable faster bursts.
Energy Management:
Use characters like Sampo (if available) or Luka to regenerate energy fast.
Perfect Turn Order:
Place Heirs after your energy regenerator or support, so they can burst immediately.
📊 Final Build Summary
Stat
Target
Notes
Main Stat
ATK% (if using 4pc The Wasted Heir)
Otherwise CR or CD
Sub-Stats
CR > CD > ER > ATK% > SPD
Prioritize CR/CD balance
Artifacts
4pc "The Wasted Heir" (Quantum)
Best for burst damage
Emblems
"The Wasted Heir" (Quantum)
Boosts burst damage
Talents
Ultimate > Normal Attack > Skill
Max Ultimate first
🏁 Final Thoughts
Abyss's Chosen Heirs shines in high-damage burst fights, especially against bosses, elite enemies, and Abyss floors.
"The Wasted Heir" set + 4pc emblem is unmatched for Quantum DPS in 5-star tier.
Prioritize CR/CD balance, ER for energy sustainability, and team synergy.
✨ Pro Tip: Use "Quantum" or "Break" decks to maximize Weakness Break and burst damage synergy.
If you have a specific version of Abyss's Chosen Heirs (e.g., Acheron, Yanqing, or another name), let me know and I’ll tailor the guide exactly to that character.
Stay strong, Trailblazer. The Abyss awaits. 🌑⚔️" onerror="this.onerror='';this.src='/assets/images/morentu/200-200.png'" uk-cover>